Navigation: Dealer System > Dealers Screen >
Using the <Manage Users> button on the Dealers screen you can add, edit, delete, and recover web users for a dealer. You can also manage passwords and lock or unlock a user. The Manage Web Users dialog, accessed by clicking <Manage Users>, is available only to institutions set up to use eGOLDTrak.
The following functions can be performed for a web user using the Manage Web Users dialog, accessed by clicking <Manage Users> on the Dealers screen:
•<Refresh List>: Click this button to refresh your list of dealers in the Manage Web Users list view.
•<Edit User>: Click on or highlight a user in the Manage Web Users list view and click this button to edit the user.
•<Create User>: Click this button to create a new web user for the dealer.
•<Reset Password>: Click on or highlight a user in the Manage Web Users list view and click this button to reset the password for the user.
•<Set Temp Pswd>: Click on or highlight a user in the Manage Web Users list view and click this button to set a temporary password for the user. Note: Your institution must have the option set to set temporary passwords for this button to be enabled.
•<Unlock>: Click on or highlight a user in the Manage Web Users list view and click this button to unlock the user. Note: Your institution must have the option set to set temporary passwords for this button to be enabled.
•<Force Update>: Click on or highlight a user in the Manage Web Users list view and click this button to force the user to update their password. Note: Your institution must have the option set to force users to update their password for this button to be enabled.
•<Recover Users>: Click this button to recover users that have been deleted.
•<Delete User>: Click on or highlight the user you want to delete in the Manage Web Users list view and click this button to delete the user.
•<Close>: Click this button to close the Manage Web Users dialog and return to the Dealers screen.

Manage Web Users Dialog
To create a new web user for a dealer using the Dealers screen:
1.Click <Manage Users>. The Manage Web Users dialog is displayed.

Manage Web Users Dialog
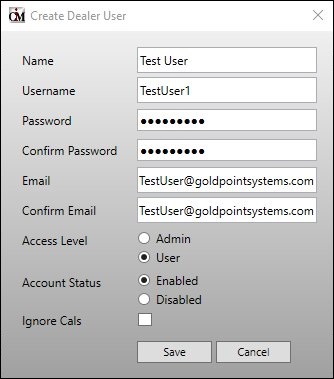
2.Click <Create User> to open the Create Dealer User dialog.

Create Dealer User Dialog
3.Enter in all of the information for the new user (name, username, password, email address) and select the access level, etc.
4.Click <Save> to create the new web user.

New User Created
5.The new user is created an appears in the Manage Web Users list view.
6.Click <Close> to return to the Dealers screen.
To edit a web user for a dealer using the Dealers screen:
1.Click <Manage Users>. The Manage Web Users dialog is displayed.

Manage Web Users Dialog
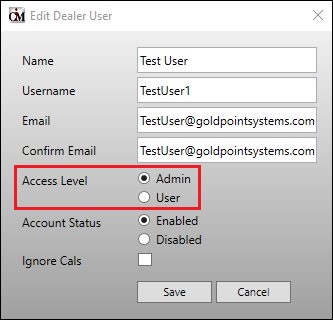
2.Select a user in the Manage Web Users list view and click <Edit User> to bring up the Edit Dealer User dialog.

Edit Dealer User Dialog
3.Modify any of the information for the user. In our example, we have changed the access level from User to Admin.
4.Click <Save> to save your changes and return to the Manage Web Users dialog.

User Has Been Modified
5.The user has been updated.
6.Click <Close> to return to the Dealers screen.
To delete a web user for a dealer using the Dealers screen:
1.Click <Manage Users>. The Manage Web Users dialog is displayed.

Manage Web Users Dialog
2.Select a user in the Manage Web Users list view and click <Delete User>.
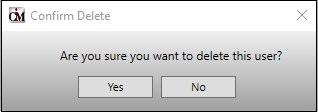
3.This brings up the Confirm Delete dialog. Click <Yes> to delete the user.

Confirm Delete Dialog
4.The web user is deleted and no longer appears in the Manage Web Users list view.

Web User Deleted
5.Click <Close> to return to the Dealers screen.
To recover a web user that has been deleted using the Dealers screen:
1.Click <Manage Users>. The Manage Web Users dialog is displayed.

Manage Web Users Dialog
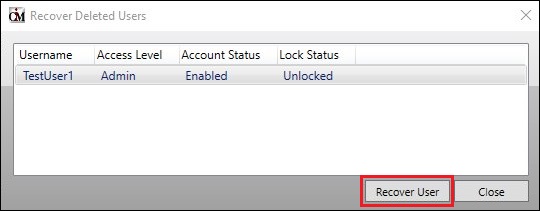
2.Click <Recover Users> to bring up the Recover Deleted Users dialog.

Recover Deleted Users Dialog
3.Select the user that you want to recover from the Recover Deleted Users list view and click <Recover User>.
4.Click <Close> to return to the Manage Web Users dialog.

User is Recovered
5.The user is recovered and appears in the Manage Web Users list view.
6.Click <Close> to return to the Dealers screen.
To reset a password for a web user using the Dealers screen:
1.Click <Manage Users>. The Manage Web Users dialog is displayed.

Manage Web Users Dialog
2.Select a user in the Manage Web Users list view and click <Reset Password> to bring up the Confirm Password Reset dialog.

Confirm Password Reset Dialog
3.Click <Yes> to reset the user's password and email the new password to the email address associated with the user.
4.Click <Close> on the Manage Web Users dialog to return to the Dealers screen.
The Manage Web Users list view is a listing of all the users and administrator users for the selected dealer. The Manage Web Users list view has the following columns:
•Name – This column lists the names of the users. Click on the top of this column to sort the users alphabetically.
•Username – This column lists the usernames of the users. Click on the top of this column to sort the usernames alphabetically.
•Email Address – This column lists the e-mail addresses of the users. Click on the top of this column to sort the e-mail addresses alphabetically.
•Date of Birth – This column lists the dates of birth of the users. Click on the top of this column to sort the dates of birth chronologically.
•Access Level – This column displays the access level of each user. A user can either be a “User” or an “Admin” (administrator). Administrator users have higher security access and are able to create and maintain other users. Click on the top of this column to group all of the users and administrator users together alphabetically.
•Account Status – This column displays the status of the account, either “Enabled” or “Disabled.” Enabled accounts are accounts that are active and can be accessed by the user. Disabled accounts are inactive accounts that cannot be accessed by the user. Administrator users can disable an account instead of deleting it if they still want to see the user in the User Maintenance list but don’t want the user to be able to access the account. Click on the top of this column to group all of the “Enabled” users and all of the “Disabled” users.
•Lock Status – This column displays the locked status of the account, either “Locked” or “Unlocked.” An account is locked after a user unsuccessfully attempts to log on to the account too many times. Click on the top of this column to group all of the “Unlocked” accounts and all of the “Locked” accounts.

Manage Web Users Dialog
See also: