History Screen |
  

|
Navigation: Loans > Loan Screens >
History Screen |
|
The Loans > History screen provides four tabs of information:
•The Converted History tab is also available in certain circumstances (see the tab help for more information).

Click to expand.
On each tab you can specify which history is displayed in the table by typing information in the search fields at the top of each tab and clicking <Display History>. Only those history items that match the criteria you enter will be displayed.
Below the search fields is a message that indicates how many history items matched your search selections.
The following are a few tips on performing searches:
•Entering information in the Start fields (Start Date, Start Time, etc.) and nothing in the "Stop" fields (Stop Date, Stop Time, etc.) will display transaction information from the date entered in the Start field up until today's date.
•Entering information in just the Stop fields and nothing in the Start fields will display information from the beginning (alphabetically or numerically) to what you entered in the Stop fields.
•Entering both Start and Stop field information will display information that falls between the two entries.
•If you leave the search fields blank, all information will be displayed.
•Check the All checkbox if you want to search for all history items, including archived history, that date back farther than the number of months your institution designates as archived history (as designated in institution option ARCM). For example, if your institution archives all history more than 18 months old (as determined by the Last Transaction Date), then if you wanted to see history that was older than 18 months ago, you would need to check the All field.
Additionally, if you right-click on the list view, the following pop-up menu appears:
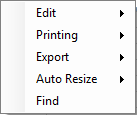
The following table explains each of these pop-up functions:
Pop-Up Function |
Description |
||
|---|---|---|---|
Edit |
Select this option to copy the highlighted information to your Windows® clipboard. You can then paste that information into Notepad or any other word processing program.
|
||
Printing |
Select this option to print the information in the list view to a designated printer. You can preview the information before printing it. |
||
Export |
Select this option if you would like to export the history information in the list view to either a tab-delimited format or to GOLDPoint System's Report Manager program. If you export to a tab-delimited format, you can open the information into a spreadsheet program such as Microsoft® Excel®. |
||
Auto Resize |
This function is used to resize the columns and rows to fit the data contained therein. |
||
Find |
The Find function allows you to search for any word, phrase, or amount in the list view. This is a helpful tool to find the exact information you are looking for. When you select this option, the Find dialog appears. Enter the information in the top field, and click <Find>. All matching information will be displayed in the list view below the search field. Double-click any of the results, and you will be returned to the list view and the item you selected will be highlighted. |
In order to use this screen, your institution must:
•Subscribe to it on the Security > Subscribe To Mini-Applications screen.
•Set up employees and/or profiles with either Inquire (read-only) or Maintain (edit) security for it on the CIM GOLD tab of the Security > Setup screen. |