Navigation: Queue Screens > Collection Screen Group > Queue Administration Screen >
The Definitions tab on the Queue Administration screen is where you define queues and set up selection criteria that causes the system to place accounts in those queues.
Setting up this tab should be the first step in creating queues. This step may require assistance from your GOLDPoint Systems account manager. However, this help provides common examples of criteria to build queues that you are free to use.
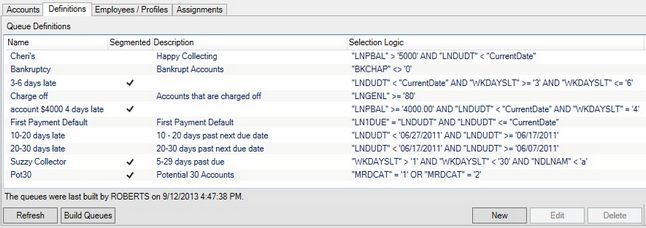
See the following example of this tab:

Queues > Collection > Queue Administration Screen, Definitions Tab
Queue Order
The queue order in the list view on this tab can be changed by selecting queues in the list and using the black arrows to the right to change their position. The order of the queues on this tab (the queue priority) is significant, because customer accounts only appear in the first queue whose criteria they match. For example, if an account is 90 days late, it would also be 60 days late and 30 days late. However, if a "90 days late" queue is higher up the list than a "60 days" or "30 days late" queue, the account would be sorted into the "90 days late" queue and not appear in the other queues.
Creating New Queues/Editing Existing Queues
To create a new queue and criteria for that queue, click <New>. The Queue Definition Builder dialog box will be displayed. This is the screen you will use to create definitions for your queues. See Queue Definition Builder for more information.
If you want to make changes to an existing queue, select it from the Queue Definitions list view, then click <Edit>. The Queue Definition Builder will then be displayed for you to make changes.
Once your queues are created/edited, you will need to build the queues, as described below.
Building Queues
Click <Build Queues> to apply any changes made to your institution's queues using this tab. When you click <Build Queues>, the system will ask: "This will erase the current queues and any custom assignments. Would you like to proceed?" Click <Yes> to complete building the queue.
You should only click <No> if you or someone else at your institution worked a long time at manually dividing up the accounts in the queue for each collector, as explained on the Accounts tab.
When you click <Yes>, the system will rebuild the queue and place all accounts matching the criteria in that queue. Collectors would then use the Collection Queues screen to process their queue and call account owners about making payments.
If you click <Build Queues> and no accounts appear in that queue, it may be due to the way the queue is set up. Queues are automatically rebuilt every night during afterhours. Therefore, if certain data was changed on the account just that day, you may need to wait until afterhours for the account to process correctly and be moved into the queue. For example, if you manually change the Hold Code on some accounts to be "4" or "5" (bankruptcy), and you set a criteria on the Queue Definition Builder that all accounts with Hold Code "4" or "5" must go in the Bankruptcy queue, the system will not send them to that queue until afterhours has run.
If customer accounts have been reassigned from one collector to another since the last build (using the Accounts tab), these changes will be lost. Changes or comments made to accounts by collectors will not be affected if you click <Build Queues>.