Navigation: Dealer System > Institution Configuration Screen > Institution Configuration Screen Details >
Email Configuration Tab
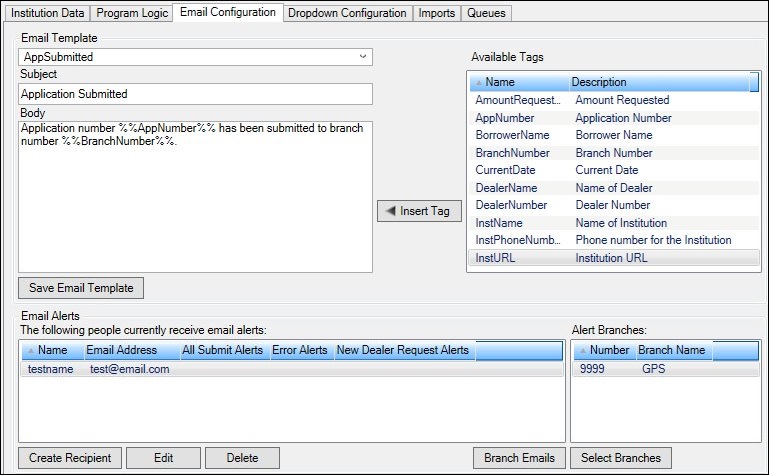
Use the Email Configuration tab to modify the e-mail templates that are used to send e-mails to customers and is used to set up individual and branch e-mail alerts.
See the following example of the Email Configuration tab followed by field and button descriptions.

Email Configuration Tab
Field |
Description |
|---|---|
Use this drop-down list to select the e-mail template to be modified. |
|
Enter the subject line (or title) of the e-mail template in this field. This text will be submitted into the Subject line of all the e-mails sent to customers under the selected template. |
|
Enter the body of the e-mail in this field. This text will be submitted in the Body of all the e-mails sent to customers under the selected template.
To include pre-configured tags that automatically insert specific information, select (or highlight) a tag in the Available Tags list view and click <Insert Tag>. This moves the tag into the Body field. |
|
The Available Tags list view shows all the pre-configured tags that you can add to the Body of the e-mail template. You can use this list view to add and sort tags. The following columns display information and can be used to sort:
•Name: Displays the name of the tag. •Description: Displays a brief description of the tag.
To include tags in the Body of the e-mail that automatically insert specific information, select (or highlight) a tag in the Available Tags list view and click <Insert Tag>. This moves the tag into the Body field. |
|
The Email Alerts list view shows all the people at the institution who are currently set up to receive e-mail alerts. You can use this list view to add, edit, or delete recipients. The following columns display information and can be used to sort:
•Name: Displays the name of the person who receives e-mail alerts. •Email Address: Displays the e-mail address that alerts are sent to. •All Submit Alerts: Displays if the person receives all alerts whenever an application is submitted using eGOLDTrak. •Error Alerts: Displays if the person receives an alert whenever eGOLDTrak sends an alert. •New Dealer Request Alerts: Displays if the person receives an alert whenever a new dealership requests to use eGOLDTrak.
The following buttons are used when modifying the Email Alerts list view:
•<Create Recipient> - Click this button to open the Create Email Recipient dialog and create an e-mail recipient. •<Edit> - Highlight an e-mail recipient in the Email Alerts list view and click this button to open the Edit Email Recipient dialog to modify the highlighted e-mail recipient. •<Delete> - Highlight an e-mail recipient in the Email Alerts list view and click this button to delete the highlighted e-mail recipient. •<Branch Emails> - Click this button to bring up the Select Branch Alert Email Addresses dialog to select a branch, and then select all of the e-mail recipients that will receive application submission alerts for that branch. •<Select Branches> - Highlight an e-mail recipient in the Email Alerts list view and click this button to bring up the Select Alert Branches dialog to select the branches for which the highlighted e-mail recipient will receive application submission alerts. |
|
The Alerts Branches list view shows all the branches for which the highlighted e-mail recipient in the Email Alerts list view will receive application submission alerts. You can use this list view to add, edit, or view branches for the selected e-mail recipient. The following columns display information and can be used to sort:
•Number: Displays the contact number. •Branch Name: Displays the name of the branch that receives e-mail alerts.
Highlight an e-mail recipient in the Email Alerts list view and click <Select Branches> to bring up the Select Alert Branches dialog to select the branches the highlighted e-mail recipient will receive application submission alerts for. |
Button |
Description |
|---|---|
Highlight a tag in the Available Tags list view and click this button to add the tag to the body of the e-mail template. |
|
Click this button to save the e-mail template. |
|
Click this button to open the Create Email Recipient dialog and create an e-mail recipient. |
|
Highlight an e-mail recipient in the Email Alerts list view and click this button to open the Edit Email Recipient dialog to modify the highlighted e-mail recipient. |
|
Highlight an e-mail recipient in the Email Alerts list view and click this button to delete the highlighted e-mail recipient. |
|
Click this button to bring up the Select Branch Alert Email Addresses dialog to select a branch and then select all of the e-mail recipients that will receive application submission alerts for that branch. |
|
Highlight an e-mail recipient in the Email Alerts list view and click this button to bring up the Select Alert Branches dialog to select the branches the highlighted e-mail recipient will receive application submission alerts for. |
See also:
Institution Configuration Screen
Institution Configuration Screen Details