Navigation: Teller System > CIM GOLDTeller Overview > CIM GOLDTeller Screen Details > Functions > Administrator Options > Print Form Design >
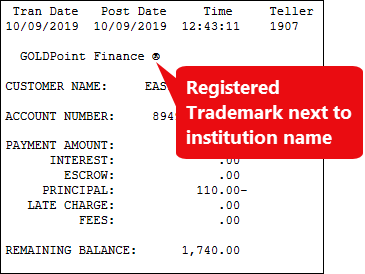
You can add trademark or copyright symbols to receipts printed from CIM GOLDTeller, as shown below:

You may need assistance from your GOLDPoint Systems account manager, but the following steps may prove easy enough for you to add it yourself. These steps are for GOLDTeller supervisors who have security access to the Administration Functions in CIM GOLDTeller. The requires the following two parts: Add Trademark Name to System Field Dictionary and Add Trademark Name to Receipts.
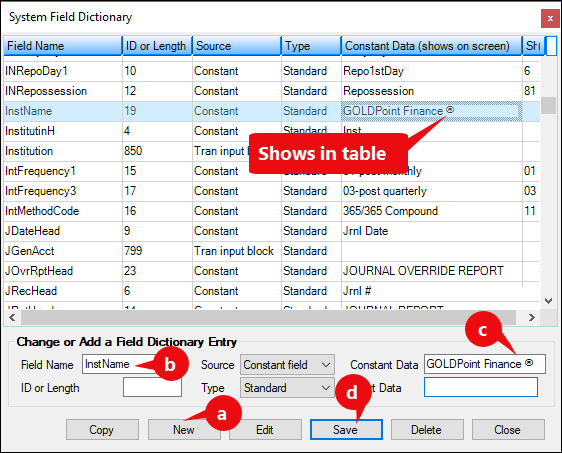
First, add your institution name and symbol you want to use to the System Field Dictionary. The System Field Dictionary is found in CIM GOLDTeller under Functions > Administrator Options.
a)In the Constant Data field, type your institution's name, then paste the trademark to use next to your name. This will require you using Microsoft® Word®, inserting a trademark symbol into a Word document, then copying that trademark symbol and pasting it after the institution name in the Constant Data field. (See this help topic in Word about how to create trademark symbols: Insert copyright and trademark symbols.
b)In the FieldName, enter InstName.
c)In the Constant Data field, type your institution's name, then paste the trademark to use next to your name. This will require you using Microsoft® Word®, inserting a trademark symbol into a document, then copying that trademark symbol and pasting it after the institution name in the Constant Data field. (See this help topic in Word about how to create trademark symbols: Insert copyright and trademark symbols.)
d)Click <Save Changes>. See the example below, then move on to Part 2.
 |
Now you need to add that field from Part 1 into the receipts where you want to include your institution's name and trademark. This is done from the Functions > Administrator Options > Print Form Design screen.
a)Select the form you want to change in the Forms list. The selected form will be displayed in the form area. (see a. in the screen example below).
b)Drag and drop the "InstName" field you added from Part 1 above. Drop in the location where you want it to show on the receipt.
c)Click <Save>.
Now when you print the receipt, your institution's name and accompanying trademark symbol will be included.
Note: We also added the ability to include a trademark symbol on statements printed from Loan History or Deposit History. See Ability to Add Trademark, Copyright Symbol to Loan Statements in the CIM GOLD Options section. |