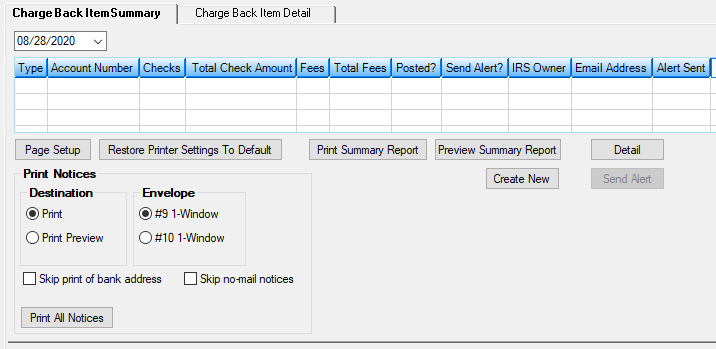
The Charge Back Item Summary tab on the GOLD Services > GOLD ExceptionManager > Charge Backs screen lists all chargebacks that were created from a specific date.

GOLD Services > GOLD ExceptionManager > Charge Backs Screen > Charge Back Item Summary Tab
You can use this tab to:
| 1. | Select a date from the date field at the top of the tab. All chargebacks that were created on that date will be displayed in the list view underneath. |
|
| 2. | Click <Preview Summary Report>. The summary of all chargebacks created on the indicated date will be displayed in a print preview of the summary report. This report displays: |
•The reason for the chargeback. •The company or person that issued the check or ACH transfer of funds (Drawn By). •The bank or institution where the account of the check or ACH was issued from (Drawn On). •The original amount of the check or ACH transfer of funds. •The date the original transaction took place. •The actual and estimated fee of the chargeback, if any. •Totals of all chargebacks for both the IRS account owner and your institution from that date. |
| 3. | After reviewing this print preview, you can print the report either from the Print Preview dialog or by clicking <Print Summary Report> on this tab. |
|
 Print notices to your customers regarding chargebacks against their accounts (Account numbers will be X'd out automatically)
1.Select a date from the date field at the top of the tab. All chargebacks that were created on that date will be displayed in the list view underneath. |
| 2. | In the Destination field group, select whether you want to view a preview of the chargeback notices or go straight to printing the actual notices. |
|
| 3. | Select the Envelope type (#9 or #10 1-window) to use for mailing the chargeback notice. Once selected, the data will not change. |
|
| 4. | If you do not want to print your bank's address on the chargeback notice, check the Skip print of bank address box. This should only be checked if your return address is preprinted on the form. |
|
| 5. | If you do not want to print a chargeback notice (for those account owners who do not want mail), check the Skip no-mail notices box. |
|
| 6. | Click <Print All Notices>. The notices will print to the designated printer or appear on the Print Preview dialog, depending on what is selected in the Destination field group. Double-click an item in the list (or select an item and click <Detail>) to view the details about the item. |
See below for an example of a chargeback notice.
|
| 1. | Click <Create New>. This will open the Charge Back Item Detail tab with the Type and Account Number open for file maintenance, as shown below. |
|
| 2. | Select the Type, enter the Account Number for which you want to create a chargeback, then click <Get N/A>. The name and address of the account owner will be displayed in the Name and Address box to the left. |
|
| 3. | Click <Create New>. The Charge Back Detail dialog will appear. Use this dialog to enter information about the chargeback (see the linked help for more information). |
|
Now you can post the chargeback to the account. See Posting and Printing Chargeback Items for more information.
|
| 1. | After posting chargeback items, access this tab. If the Posted? column in the list view is checked for a chargeback, you can send alerts for the chargeback on the account. |
|
| 2. | In the Send Alert? column, mark the checkbox for each chargeback item for which you want to send a notice. |
|
| 3. | Click <Send Alert>. The IRS account owner will receive an email alert notifying them of the chargeback, and the Alert Sent column will display a checkmark. If you use this feature, contact your GOLDPoint Systems account manager with the wording you want to use for these alerts. Depending on how many accounts this person or organization has, they may receive more than one email alert. An alert will be sent for each check on the notice. |
|

![]() Print notices to your customers regarding chargebacks against their accounts (Account numbers will be X'd out automatically)
Print notices to your customers regarding chargebacks against their accounts (Account numbers will be X'd out automatically)