Mass Loan Payments Screen |
  

|
Navigation: Loans > Loan Screens > Transactions Screen Group >
Mass Loan Payments Screen |
|
Use this screen to quickly process multiple transactions for multiple accounts. This function is especially useful if your institution has one employee or a small number of employees responsible for entering loan payments on accounts. For example, if you receive many loan payment checks each day in the mail, an employee can use this screen to enter that information for each account.
The Mass Loan Payments function allows you to perform loan payment transactions 600 (and 2600) and 690 and payments with principal decreases.
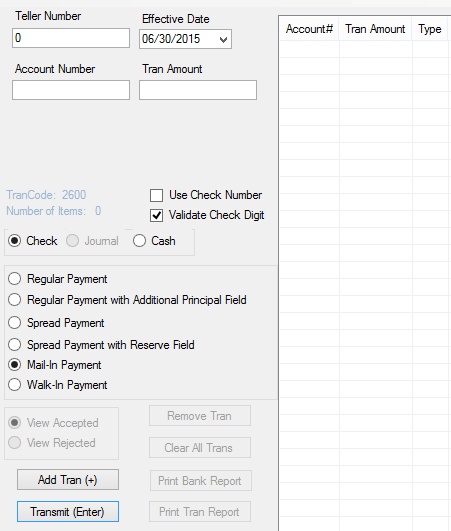
Loans > Transactions > Mass Loan Payments Screen
The fields that are visible on this screen depend on which transaction type is selected (as explained in step 2 below). See Mass Loan Payments fields for more information about these fields.
To process a mass loan payment on this screen, follow the instructions below:
1.Access this screen in CIM GOLD.
2.Use the radio buttons on this screen select the type of transaction you are running. If you are entering many transactions, you will want to make sure to group the transactions according to the type of transactions being run. The system only allows one type of transaction for each transmission. For example, if you have a pile of loan payments that are from walk-in payments, mail-in payments, and regular payments, you would group the mail-in payments together and process those; then group the walk-in payments and process those; and then group the regular payments and process those.
Possible transaction types are listed below. Follow the links for more information about each transaction type
Regular Payment with Additional Principal Field
Spread Payment with Reserve Field
Hint: Select the transaction type first, because if you enter account information first, and then change the transaction type, the system will ask you if you want to clear all transactions. You will either have to process the transactions with the transaction type that was already selected, or you will lose all the information you entered and be forced to enter it again using the transaction type you need.
3.Select Check, Journal, or Cash radio button to indicate the mode of payment the borrower is using. Note: Journal is not available when making a Mail-In Payment or Walk-In Payment.
4.Type an account number in the Account Number field and the amount of the loan payment in the Transaction Amount field.
|
Note: If running a Regular Payment with Additional Principal Field transaction, you would also need to enter the amount of the additional principal in the Additional Principal field. This field does not appear on the screen until you select the Regular Payment with Additional Principal Field radio button. Similarly, if you are running a Spread Payment or Spread Payment with Reserve Field transaction, enter the appropriate payment information in the Principal, Interest, and Reserve 1 fields. |
|---|
5.Click <Add Tran (+)>. Hint: If using the number keypad to quickly enter account information, press the <+> key.
6.Enter the Effective Date of when the mass loan payments will be processed. You can select a date in the past if you want to backdate these payments. However, the Effective Date cannot be prior to the last transaction date. You can also select a date in the future. The default entry for this field is today's date.
7.Repeat steps 4 and 5 for as many transactions you need to process using this transaction type.
8.After all transactions are entered for the different loan accounts, click <Transmit (Enter)>, or press the <Enter> key on your keyboard. GOLDTeller will launch and the Mass Loan Payments transaction will be displayed with the information you entered.
9.Finish processing the transaction by clicking <Transmit>. (For more information on the Mass Loan Payments transaction in GOLDTeller, see Mass Loan Payments in the GOLDTeller User's Guide on DocsOnWeb.)
10.The list view on the right side of this screen displays all transactions that are set up to be paid or have already been processed. If you only want to view accepted transactions, select the View Accepted radio button. Select the View Rejected radio button if you only want to view those transactions that were rejected. See below for more information about this list view and these radio buttons.
![]() Mass Loan Payments list view and Accepted/Rejected radio button details
Mass Loan Payments list view and Accepted/Rejected radio button details
Once you click <Transmit>, the system will return a message on this list view as to whether the transaction was accepted or rejected. Click the View Accepted or View Rejected radio button (at the bottom-left of this screen) depending on what you want to see, and this list view will display those transactions accordingly. Click <Remove Tran> to delete a selected transaction from this list.
Loan payments that require a teller or supervisor override will reject. You can either remove accounts for additional research, or in GOLDTeller, you can click the TOV checkbox for teller override or SOV checkbox for supervisor override, and then click the <Retry Rejects> button. An override dialog will appear and require you to enter an override code. Once the override is entered, all transactions will then be posted with the override.
If all the rejected items are posted in one batch, you could check the override checkbox at the beginning and then enter the account information. When you click <Transmit>, the override dialog box will appear.
You can print a report of all rejected items by selecting the View Rejected radio button and then clicking <Print Tran Report>. |
11.Click <Clear All Trans> after you have processed that batch of payments. To process another type of payment transaction, repeat steps 2 through 9.
12.Print a report of the transactions by clicking either <Print Bank Report> or <Print Tran Report>.
See also in DocsOnWeb:
|
Record Identification: The fields on this screen are stored in the BTTB record (Teller System Transaction Bloc). You can run reports for this record through GOLDMiner or GOLDWriter. See BTTB in the Mnemonic Dictionary for a list of all available fields in this record. Also see field descriptions in this help manual for mnemonics to include in reports. |
|---|
In order to use this screen, your institution must:
•Subscribe to it on the Security > Subscribe To Mini-Applications screen.
•Set up employees and/or profiles with either Inquire (read-only) or Maintain (edit) security for it on the CIM GOLD tab of the Security > Setup screen. |