Card Profiles |
  

|
Navigation: Loan Screens > Account Information Screen Group > Payment Information Screen > Card Payments tab >
Card Profiles |
|
Click the Card Profiles link on the Card Payments tab to add, change, or delete card information for the borrower. You can also flag a card as being restricted, which means the card cannot be used.
When you click the Card Profiles link at the bottom of the screen, the Card Profiles dialog box is displayed, as shown below:
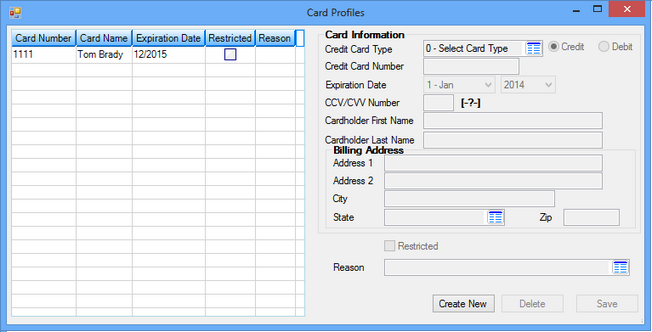
Note: Depending on your EZPay options, your Card Profiles dialog box may look slightly different from the example above. For example, if your institution only allows debit cards, the Credit radio button will not be displayed. See the Debit/Credit Cards topic for all options available for card payments.
If you want to create a new card record for this borrower, click <Create New> and enter the fields on the right of this dialog box. For detailed information concerning each of these fields, see the following descriptions. Click <Save Changes> to save your changes. The card information will be displayed in the list view to the left, and the card information will also be displayed in the Card Profiles list view on the EZPay screen. If you want to delete a card record, select it from the list view on the left and click <Delete>.
Important: Once a card is set up and saved, it cannot be edited. If any information was erroneously entered, you will need to delete the card by selecting it in the list view table and clicking <Delete>. You can re-enter card information by clicking <Create New> and entering the field information again.
If a card is rejected for any reason, but you do not want to delete the card information until you are sure the card is no longer valid, you can mark the card as Restricted and assign it a reason in the Reason field.
|
Note: Card information can also be set up on the Loans > Transaction > EZPay screen, then click the Card Profiles link after selecting the Debit/Credit Card radio button. |
|---|
Field |
Description |
||||||||||||
|---|---|---|---|---|---|---|---|---|---|---|---|---|---|
Card list view |
On the left of the Card Profiles dialog box is a list view that lists all credit and/or debit cards set up for this account. If the card has been rejected, you can check the Restricted box to indicate the card should not be used. |
||||||||||||
Credit Card Type
|
Click on the list icon to bring up a list of available credit card types, then select the correct type. You must select a card type or the system will display an error-provider icon
EZPay IMAC options affect which card types are displayed in this list. Your institution may not accept all these types of credit cards. Your GOLDPoint Systems account manager can set up the following options for your institution:
•Master Card (EZMACD) – Set this option if the institution will accept Master Card when making loan payments. •Discover (EZDISC) – Set this option if the institution will accept Discover Card. •American Express (EZAMEX) – Set this option if the institution will accept American Express. •Visa (EZVISA): – Set this option if the institution will accept Visa Card. |
||||||||||||
Credit/Debit |
Select the applicable radio button if this card is a debit or credit card. EZPay IMAC options may restrict your institution from using one or the other. Your GOLDPoint Systems account manager can set up the following options for your institution:
•Debit Card Only (EZDBTS): If this option is selected for your institution, the Card Profiles dialog box only allows debit card information. The Card Profiles dialog box will only show the Debit radio button when setting up or editing a card profile.
•Credit Cards Only (EZCCON) allows only credit cards (not debit cards) when making payments. The Card Profiles dialog box will only show the Credit radio button when setting up or editing a card profile. |
||||||||||||
Card Number |
Enter the card number for the payment in this field. |
||||||||||||
Expiration Date/Month |
Click the arrows to select the expiration date for the card. The date for cards consists of only the month and year, and it is listed on the front of the card. |
||||||||||||
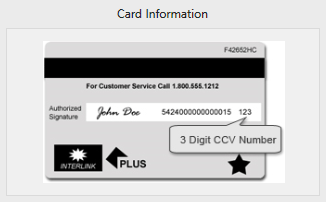
CCV/CVV Number |
Enter the CCV or CVV number for this card.
|
||||||||||||
Cardholder First Name |
This is the first name of the card holder as it is displayed on the front of the card. |
||||||||||||
Cardholder Last Name |
This is the last name of the card holder as it is displayed on the front of the card. |
||||||||||||
Billing Address |
Depending on EZPay IMAC options set up for your institution, Billing Address fields may not be needed when verifying cards. If these fields are grayed out, you are not required to enter billing address information. If these fields are not grayed out, enter the street, city, and state information needed to verify that this card is valid.
Another option may determine if you must also enter the ZIP code of the address, or if only the ZIP code of the address is required and not the Billing Address.
These are the following options that are set by you GOLDPoint Systems account manager:
•"A – All fields open." When this option is selected, all fields are open and required on the Card Profiles link. The Billing Address field group (including ZIP field) is open to file maintenance.
•"Z – ZIP code only." When this option is selected, only the Card Information fields and the ZIP code are required for card verification. The Billing Address fields will be grayed out, except for the ZIP field.
•"N – Name only with no address fields." When this option is selected, the only thing needed is the Card Information when entering cards for payments. The Billing Address fields and ZIP field will be grayed out.
|
||||||||||||
Restricted |
Check this box if the card has been restricted. Possible reasons for restricting a card include the maximum balance has been reached, the card is expired, etc. You may want to keep the card information instead of deleting the information, in case someone attempts to use the card in the future. In that case, you should check this box.
Your institution may also require you to enter a reason for the restriction, as described below. |
||||||||||||
Reason |
If you check the Restrict box above, you should select a reason why this card is restricted from this list. The reasons for card restriction are set up by GOLDPoint Systems. Possible reasons are:
Card has had multiple declines, do not accept. Account has been closed. Card limit has been exceeded.
|
 .
.