Navigation: GOLD Services Screens > GOLD ExceptionManager Screen Group > Administrative Screen Group >
Before printing any 3-up notices from GOLD ExceptionManager, you must calibrate your printer on the GOLD Services > GOLD ExceptionManager > Administrative > Printer Calibration screen. This screen will only need to be set up once if your institution uses 3-up notices. If you only use one-page notices, you will not need to calibrate your printer using this screen.

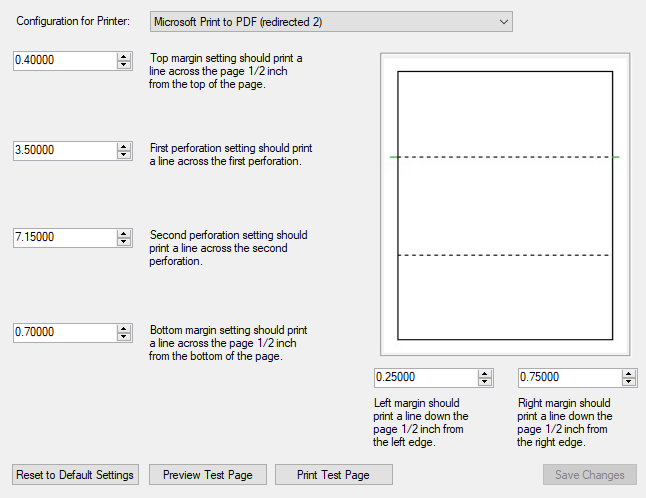
GOLD Services > GOLD ExceptionManager > Administrative > Printer Calibration Screen
Failing to properly calibrate printers if necessary will cause notices to print improperly. Security to this screen should be limited.
The default settings for this screen are the most common settings for printers. Based on your network setup, operating system, printer, and print drivers, you may need to adjust the settings so that all GEM printing for GOLD ExceptionManager uses half-inch margins on all four edges, and that the two lines print exactly on the perforation of an 8.5" by 11" sheet of paper.
You may need to repeat this process for every GOLD ExceptionManager user if they are going to print notices.
Complete the following steps to calibrate your printer:
1.Using the Configuration for Printer field on this screen, select which printer you want to print your notices.
2.Click <Preview Test Page>. A test page will appear on your screen displaying how your notices will print.
3.Click <Close>. You will return to the Calibrate Printer screen.
4.If necessary, use the other fields on this screen to adjust the print settings (first/second perforation, top/bottom/left/right margins).
5.If necessary, return to your test page by clicking <Preview Test Page>. Repeat steps 2-4 as needed until the settings are calibrated correctly.
6.You can print a test page to the printer you selected by clicking <Print Test Page>. If the document lines up with half-inch margins and the two lines are exactly at the one-third and two-thirds positions on the page, your printer has been successfully calibrated. If not, repeat steps 4-5 until it does.
7.Click <Save Changes>.
For more information on additional notice options and how to print notices, see help for the Institution Options and Print Notices screens.
In order to use this screen, your institution must subscribe to it on the Security > Subscribe To Mini-Applications screen. |