Loan System |
  

|
Navigation: CIM GOLD What's New > What's New in Version 7.9.3 >
Loan System |
|

Figure 1: Loans > Check Printing > Checks Screen
Enhancement |
Description |
||
|---|---|---|---|
New Screen for Printing Funding Checks (continued)
|
New Check Records
If you need to create a new check for a boarded loan, and it doesn't appear in the list-view table when you click <Retrieve>, you can add the check record by clicking <Add Check>. (Note: You must have "Funding" selected in the Check Type field to enable this button. See CMP 8240 in the July Update to read about a new institution option that will default the Check Type when users access this screen.)
A dialog box appears (as shown in Figure 2 below), where you must enter a valid account number and check information. Then you can print a check for that account by selecting the record and clicking <Print Checks>.
As part of this new screen, we added two new fields in the Check Printing Utility record (FPCK) to accommodate longer payee names for check records. The two new fields are:
1.Check Payee 1 Addition (CKPY1A, 40 characters) 2.Check Payee 2 Addition (CKPY2A, 40 characters)
Use these fields to create checks to payees with more than 40 characters in their name (up to 80 characters total). You will need to add these two new fields to the Check Format you design for printing funding checks, so when loans are boarded with longer names, the fields will map correctly. An example of these new fields on a Check Format is shown in Figure 3 below.
G/L Accounting
The General Ledger accounts used to debit (or credit if the check is voided) the funding checks are entered in two new fields on the GOLD Services > Office Information screen > G/L Account tab. Add the applicable G/L accounts in the Funding Check Debit and Funding Check Credit fields (see Figure 3 below).
Check History
Once checks are printed, they move to the Printed Status. Any checks that are printed are recorded in the Journal In (tran code 1810) and Journal Out (tran code 1800) fields for the Teller Totals and can also be viewed in the Electronic Transaction Journal (see Figure 4 below). Funding checks are also reconciled in the Check Reconciliation system (see CMP 8037 in the July Update).
Check Format Setup
From CIM GOLD version 7.9.2 and above, only one Check Format number 15 is available to use with funding checks. Additionally, the two new check payee fields (Check Payee 1 Addition and Check Payee 2 Addition) have been added to the list of fields to be used for the Check Format (see Figure 3 below). You may need to contact GOLDPoint Systems for help in setting up your check formats the first time. See the Check Format Setup screen in DocsOnWeb for more information.
Security
If you want to use this screen, you must first subscribe to it under Security > Subscribe to Mini-Applications. Security must also be enabled for all users or profiles who need access to this screen using the Security > Setup screen > CIM GOLD tab (under Loans > Check Printing > Checks).
Contact your GOLDPoint Systems account manager if your institution is interested in using this new screen for printing funding checks. Also review the help for this screen for further information. |

Figure 2: Loans > Check Printing > Checks Screen, then click <Add Check>

Figure 3: Loans > Check Printing > Check Format Setup Screen

Figure 4: Teller System > Electronic Transaction Journal
Enhancement |
Description |
|---|---|
|
CMP: 6487, 6488, 6494, 6495, 6640 Work Order: 509544
CIM GOLD Version 7.9.3 |
For those institutions that allow a new loan to pay off multiple open loans, a new list view table can be displayed on the Loans > Original Loan Disclosure screen that shows all the loans the new loan paid off, as shown in Figure 1 below.
To view this chain of debt, institution option TREE must be turned on for your institution, in addition to your institution allowing a new loan to pay off multiple accounts through a third-party origination program. The list view table, or tree, will display any accounts that were closed when the selected account was opened. Double-clicking on a closed account in the tree will bring up information for that account.
A new API is also available that can be used on your website for customers to open new loans to pay off old loans. Programming will need to be set up by your website administrator and GOLDPoint Systems.
Contact your GOLDPoint Systems account manager if your institution is interested in implementing these new features.
Note: As advertised in the April Update document, we released two new records to enable this capability to keep track of the chain of debt. Record CSDC (Chain of Debt Old to New) and CSCD (Chain of Debt New to Old) have been released. See the CSDC and CSCD topics in the Mnemonic Dictionary for more information. |

Loans > Original Loan Disclosure Screen
Enhancement |
Description |
|---|---|
New Payment Adjustment Screen for Removing/Inserting Transactions
CMP: 6798, 7815, 8045, 8574, 8581, 9247 Work Order: 509272
CIM GOLD Version 7.9.3 |
We have completed programming for a new payment adjustment screen. This screen is found under Loans > Transactions > Payment Adjustment in the left tree navigation.
This screen allows you to first test and view how an account is affected by removing a payment or inserting a payment. After reviewing how those actions affect the account, you can then execute the change into the account.
This screen allows users to manually reverse or insert payments on a customer loan account. Payment reversals and insertions are generally used to correct errors. For example:
•A reversal could be used to remove a duplicate payment accidentally processed on an account.
•An insertion could be used to retroactively apply a payment to a customer's account if that customer's lockbox payment was initially misplaced and later recovered by your institution.
The results show how the principal and interest are affected by the inserting or deletion, as well as whether any applied late charges or fees are affected.
For example, a borrower made a payment in March, April, and May, but the payment in May returned as non-sufficient funds. It is now June. You need to reverse the payment made in May, which needs to also apply any late charges that would have incurred because the payment is now late.
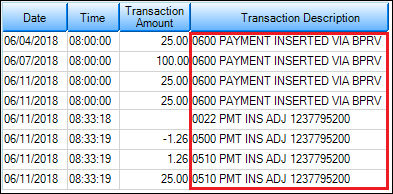
When payments are inserted through this screen, History shows the payment inserted via BPRV, which is the Payment Reversal (and Insertion) function. When payments are reversed through this screen, History will show adjustment transactions with the description similar to "PMT REV ADJ NNNNN," where NNNNN is a system-defined, unique code used for tracking purposes. See the following Loan History items showing these details:
You can also view system history of corrected transactions and their effects on the customer account using the History Analysis tab on the screen (see Figure 2 below).
See an example of this screen below and see help for this screen for more information about how it functions. |

Figure 1: Loans > Transactions > Payment Adjustment Screen

Figure 2: Loans > Transactions > Payment Adjustment Screen > History Analysis Tab
Enhancement |
Description |
|---|---|
Apartment/Unit Number Now Shows on CIF Tab on Marketing and Collections
CMP: 6384 Work Order: 50431, 52383
CIM GOLD Version 7.9.3 |
The apartment/unit number is now included in the Property Address and Mailing Address fields on the CIF tab of the Marketing and Collections screen. The apartment/unit number is usually entered in the Street 2 field of the address on the Addresses tab (accessed by clicking the Edit Address link on the CIF tab).
This will make it easier and quicker to establish whether the correct address is connected to the borrower. See the following example of an address with an apartment/unit number.
|

Loans > Marketing and Collections Screen > CIF Tab
Enhancement |
Description |
|---|---|
|
CMP: 6331 Work Order: 50278
CIM GOLD Version 7.9.3 |
The Loans > History screen > Detailed History tab now allows users to properly save changes by clicking the <Save> button when the Skip On Statement boxes are selected or unselected. Previously, the <Save> button was not enabled when those boxes were checked.
|
|
CMPs: 7725, 7554, 8350, 8482, 8483, 8511, 8746, 9134, 9179, 9399, 9469, 5821, 9529, 9623, 9656
CIM GOLD Version 7.9.3 |
Many adjustments and improvements have been made to bankruptcy processing in CIM GOLD:
•Additional prepetition arrearages can now be created and added to the claim using the new Create New Prepetition Items field group on the Prepetition Arrearage tab on the Claim Information dialog (see Figure 1 below). To do this, indicate an Item Description and Claim Amount (mnemonic: PTCLMA) and use the adjacent checkbox field to indicate whether the full prepetition amount is Allowed (mnemonic: BACEP1). When <Add/Save New Item> is clicked, the new prepetition item will be added to the list of arrearages at the top of this dialog. Repeat this step for as many new arrearages as needed.
•The numeric text field at the bottom-right of Item 9 of the Bankruptcy POC dialog normally displays the interest rate on the account as of the time bankruptcy was filed. If the interest rate at the time of bankruptcy filing was zero as a result of the account being charged off (depending on your institution’s COOP options), this field will now display the account's origination rate. If for some reason the account was originated with a zero rate, this field will display the account's original APR value.
•If there is only one customer name attached to the account as displayed in the list view at the top of the Loans > Bankruptcy and Foreclosure > Bankruptcy Detail screen, that name will automatically be selected when processing a bankruptcy on that screen.
•Adding and saving information on the Claim Information dialog automatically refreshes the Total Claim Amount on the Bankruptcy Detail screen.
•Clicking <Confirm Plan> automatically saves all changes to the Bankruptcy Detail screen.
•A range of dates can now be indicated on the Court Records Search screen when using the Custom field (rather than indicating a single date).
•If an amount is manually entered into the Allowed Claim Amount field that does not match the Total Claim Amount, the Claim Information dialog box will automatically open displaying an error message (see Figure 2 below). A warning indicator will also show next to the Allowed Claim Amount. Either the Allowed Claim Amount needs to be adjusted to match the Total Claim Amount, or more likely, the arrearages will need to be adjusted on the Claim Information dialog box.
•If a Chapter 13 bankruptcy has been confirmed (via the Confirmed by Court Chapter 13 field group on the Bankruptcy Detail screen), prepetition arrearage items can no longer be added via the Claim Information dialog.
•If errors exist on the Bankruptcy Detail screen when a user attempts to exit, a prompt now appears asking the user to confirm that they wish to exit and informing them that unsaved changes to the screen will be lost if they do.
•The Bankruptcy Detail screen no longer allows chapter 13 bankrupt loans with a confirmed plan to be corrected off. |

Figure 1

Figure 2
Enhancement |
Description |
|---|---|
|
CMP: 8866
CIM GOLD Version 7.9.3 |
A new screen is available, Securitization, under Loans > Investor Reporting. This new screen allows you to quickly assign loans to an Investor Master and Investor Group. Security for this screen should only be given to supervisors responsible for Investor (Secure) loans.
See the following example of this new screen. Also see the help for this screen on DocsOnWeb.
Note: This screen was previously a GOLDPoint Systems-controlled screen. Now we are making it available for all institutions to secure loans themselves.
Security
If you want to use this screen, you must first subscribe to it under Security > Subscribe to Mini-Applications. Security must also be enabled for all users or profiles who need access to this screen using the Security > Setup screen > CIM GOLD tab (under Loans > Investor Reporting, then Securitization). |

Figure 1: Loans > Investor Reporting > Securitization Screen
Enhancement |
Description |
|---|---|
Extend Original/Remaining Term by Deferment
CMP: 5144, 5630 Work Order: 49056
CIM GOLD Versions 7.9.3 |
Two new checkbox fields are available in the Options field group on the Loans > Account Information > Precomputed Loans screen: Extend Original Term by Deferment (LN78EO) and Extend Remaining Term by Deferment (LN78ER).
These checkbox fields affect the amount of precomputed interest returned back to the borrower if the loan is paid off early and if the loan ever had a deferment. If the loan never had a deferment, these fields are not used in the interest rebate calculation at payoff. Only one of these checkboxes can be selected at a time. If the Extend Original Term by Deferment is selected, the Extend Remaining Term by Deferment cannot be selected, and vice versa.
See the Precomputed Loans help for more information about these fields.
See an example of the Precomputed Loans screen displaying these new checkboxes: |

Loans > Account Information > Precomputed Loans Screen

Loans > Statistics and Summaries > Summary Screen
Enhancement |
Description |
||
|---|---|---|---|
Commercial Loans Screens Brought Over to CIM GOLD From GOLDVision
CMP: 3208, 3328 Work Order: 45674
CIM GOLD Version 7.9.3 |
Three Commercial Loans screens that were previously accessed from GOLDVision have been added to CIM GOLD. These screens are used to handle your institution's property management needs for commercial loans.
These screens can be found under Loans > Commercial Loans in CIM GOLD and are as follows:
•Property Income/Expense/Units Screen: Use this screen to view and edit income, expense, and basic unit information about the selected commercial loan property.
•Property Inspection/Tenants Screen: Use this screen to view and edit information about inspections performed on the property, information about tenants of the property, and basic contact information for the property.
•Property Management Screen: Use this screen to view and edit information about property and financial profiles, appraisal and Broker Price Opinion (BPO) information, and amenities for the selected commercial loan property.
See help for these screens in DocsOnWeb for more information about how they function. |
||
Payoff Reminder Dialog for Future Payoffs in EZPay
CMP: 9382
CIM GOLD Version 7.9.3 |
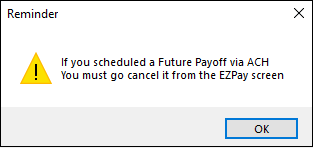
If your institution has the Require Payoff Lock option enabled and a future payoff has been scheduled on the Loans > Transactions > EZPay screen for an account that has been locked for payoff (on the Loans > Payoff screen), unlocking the account will now cause a dialog to appear reminding the user to go to the EZPay screen and delete any scheduled future payoffs or payments, as shown below.
When unlocking an account on the Payoff screen, verify that any scheduled future payments/payoffs have been removed from the EZPay screen.
See the Payoffs topic in the EZPay help for more information. |
||
New EZPay Option: Cleanup Future Payments
CMP: 8774, 9223, 9382, 9508
CIM GOLD Version 7.9.3 |
A new EZPay option (Cleanup Future Payments, mnemonic EZCUFP) is available in CIM GOLD versions 7.9.3 and above. This new option (toggled by a checkbox field on the EZPay IMAC Table screen, which must be accessed by GOLDPoint Systems on behalf of your institution), causes future payment records (FPRA/FPAS) to be removed from the system if a corresponding stored ACH external account (FPEA) is deleted.
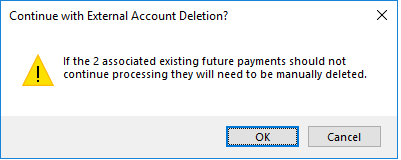
•If this option is set, a prompt will appear on the Loans > Transactions > EZPay screen when a user attempts to delete an ACH external account that is used in recurring or future one-time payments. This prompt will inform the user that any future payments using the selected routing and account numbers will be removed from the system and that the customer will need to re-schedule the one-time or recurring payments using a different external account, if desired (see below):

•If this option is not set, a different prompt will appear on the EZPay screen when a user attempts to delete an ACH external account that is tied to future payments. This prompt will inform the user that all future payments will still use that ACH information and will need to be removed individually in order for payments to process properly (see below):
 |
||
Multiple Payments For Loan Frequency Now Available
CMP: 7228, 7279, 7756, 7757, 7442, 7710, 7783, 7884, 8819, 8820, 8361, 8653, 9103, 9244, 9468, 9340, 9338, 9244, 9389, 3282, 9207, 9137, 9167, 9014, 9066, 9067, 9140, 9542, 9564, 9565, 9580, 9138, 9139, 9322, 8867, 6854, 9626, 9630, 9382, 9212, 9241, 9322, 8951, 9687, 8867
CIM GOLD Version 7.9.3 |
You may have customers who would like to make more regular recurring ACH payments than the regular loan frequency. For example, you may have customers that want to make a portion of their loan payment on a weekly basis, even though their loan frequency requires a monthly payment.
We have programmed CIM GOLD to now allow for just these types of scenarios. Using the EZPay screen, your institution can process ACH recurring payments based on a schedule other than the regular loan frequency.
This new enhancement required a complete reorganization of the Payment Information and Signature Loan Details screens, as well as adding new options to the EZPay IMAC Table. The EZPay IMAC Table is set up by your GOLDPoint Systems account manager. The options in that table allow certain fields and methods of payment on the EZPay screen, as will be discussed further in this release.
Changes to Payment Information and Signature Loan Details Screens
The first thing you may notice when downloading and accessing CIM GOLD version 7.9.3 is that the Payment Information and Signature Loan Details screens look differently. We have added an ACH Payments tab that shows all recurring and one-time ACH payments scheduled for the account (see A below).
We have also removed the Recurring Payment field group, where users could enter recurring payment information directly in those fields. Now users will only be able to enter payment information by clicking the new <Add/Modify> button at the bottom of the ACH Payments tab (see B below). Clicking that button brings up a pop-up version of the EZPay screen.
 Click to expand.
EZPay Setup
In order to allow for differing recurring ACH payments, your GOLDPoint Systems account manager will need to set up the following options on the EZPay IMAC Table:
•Show Weekly ACH Recurring (EZRAWK) •Show Bi-Weekly ACH Recurring (EZRABW) •Show Semi-month ACH Recur (EZRASM) •Show Monthly ACH Recurring (EZRAMO)
When these options are set, the Recurring ACH Payment field group on the EZPay screen changes slightly, as shown below. (Note: These are host-based fields and were released in the June 2018 release; see CMP 7757 in the June Update.)
 Click to expand.
You can see in the screen example above that all four recurring payment options are available. Your institution can use whichever options you need. You can set up all these options, but whether or not they all show on the EZPay screen is determined by the loan frequency.
These options cannot be used to set up a payment schedule that is less frequent than the established loan frequency. For example, a loan with a frequency of weekly will not show the Weekly, Bi-Weekly, Semi-Monthly, and Monthly options.
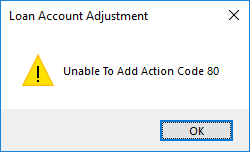
Note: For loans with a weekly frequency, users will only be allowed to set up the recurring payment for a maximum of three days before the Due Date. If the user attempts to set the recurring payment for a date more than three days before the Due Date, they will receive the following error message:
 Click to expand.
Institution option FPRA must be set in order to use recurring payments. For more information about recurring payments, see the Recurring Payments topic in the EZPay help on DocsOnWeb. |