Navigation: »No topics above this level«
This manual is designed to give you a well-rounded understanding of the GOLD EventLetters™ program. It will guide you step-by-step through the event letter processing procedures, including downloading, printing, and saving the letters, as well as setting up the event letters, tying them to data source files, and finally assigning merge letters to specific events.
This chapter gives you a brief overview of the GOLD EventLetters program and how it works. It also provides you with a summarized description of the events available and a list of the event merge fields.
GOLD EventLetters first requires that you set up merge letter templates on your PC using the Microsoft Word® "Mail Merge" function and linking the letters to a data source file. This is described in detail in GOLD EventLetters Setup Procedures.
The data file is created in the afterhours process using the host computer. The data file is created as a result of either automatic "events" occurring on one or several accounts, or a result of user-requested events. Examples of events could be new accounts, late payments, interest rate changes, deposit account maturity, etc. You can also have different letters for each event, such as a letter for new accounts opened with more than $25,000, or another letter for new accounts opened with less than $1,000. Each event has a possibility of 255 letters that can be created. The event information is explained in further detail in Loan Event Processing and Deposit Event Processing.
After the letters have been merged, you can preview a sample letter before you print the batch. You can either print all of the letters at once, print selected letters, or save the merged letter. This is described in Printing and Saving Event Letters.
GOLD EventLetters saves the data for the letters to the "Have Been Printed" folder on your PC. The data will stay there until you either move them to the "Archived Events" folder, you back them up to a diskette, or you delete them.
Before anyone at your institution can use GOLD EventLetters, they must first be set up with the proper security clearance. See Setting Up GOLD EventLetters Security for more information.
Additionally, you may want to set up files and other options where you can easily find your letters and data source files. See Setting Up the GOLD EventLetters System for more information.
See Loan Event Description and Deposit Event Description for more information about the different types of event records.
 |
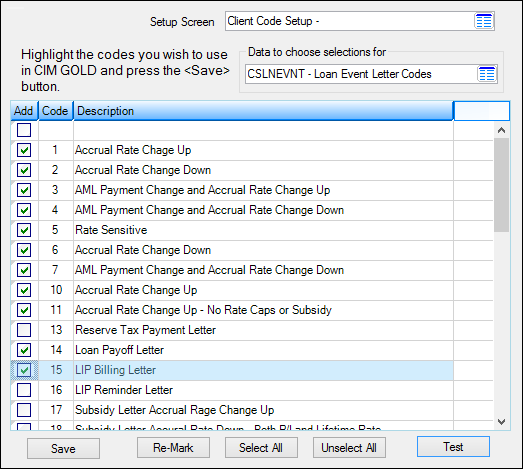
Setup Tip: Your GOLDPoint Systems account manager must set up each event in institution option EVNT. Additionally, your institution's security administrator needs to flag each event letter your institution wants to use. To do this, they need to checkmark the Add box for each event letter on the Loans > System Setup Screens > Client Code Setup > CSLNEVNT - Loan Event Letter Codes screen, as shown below: |
|---|

Loans > System Setup Screens > Client Code Setup > CSLNEVNT - Loan Event Letter Codes Screen
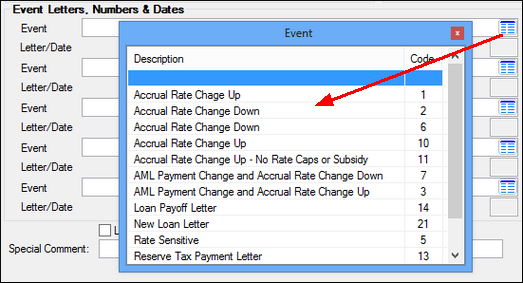
Once the event is checked, it is included in the Event list on the Action/Holds/Events tab, as shown below:

Loans > Marketing and Collections Screen, Actions/Holds/Events Tab