Navigation: Security Screens >
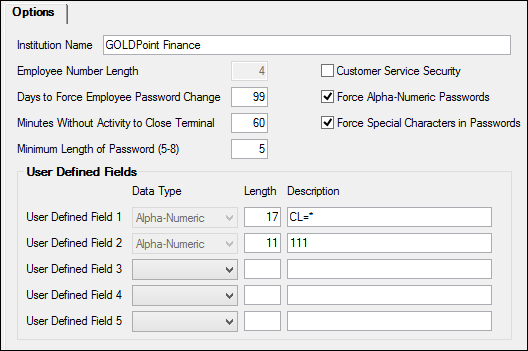
Use the Company Options screen under the Security system to create options specific to your institution. See the following example of this screen:

Security > Company Options Screen
To set up your company's security options, complete the following steps in the fields on this screen:
1.Enter your institution's name in the Institution Name field (mnemonic IOBSNAME).
2.Indicate a default employee number length in the Employee Number Length field (mnemonic IOBSENLEN). The length can range from a minimum of four to a maximum of 10 digits. Once a number is designated in this field, the system returns an error message if someone attempts to create a new employee security that does not use at least this number of digits. Employee security is set up using the Security > Setup screen.
3.Indicate a number of days between password changes in the Days to Force Employee Password Change field (mnemonic IOBSDAYS). Enter a number between 15 and 99 (entering 9999 indicates that passwords will never expire) to define the default number of days between forced password changes for your institution. This company default can be overridden during individual employee setup using the Password Expiration field on the Employee tab of the Setup screen. This feature protects your institution from fraudulent use of a security code for any extended period. Should a security code be violated, the user could immediately create a new security code. If the violation goes undetected, the violated code is only usable until the Days to Force Employee Password Change days are reached. See Passwords for information.
4.Enter the number of minutes that will trigger a timeout for users in the Minutes Without Activity to Close Terminal field (mnemonic IOBSMINS). The timeout requires the user to re-enter their security code. The sign-on screen appears after this many minutes of inactivity in CIM GOLD. A minimum of 5 and maximum of 60 minutes must be entered; the system will not accept a number outside that range. (The default is 20 minutes.) This company default can be overridden during individual employee setup (in the Timeout Minutes field on the Employee tab of the Setup screen), but only if the Timeout Minutes is more than what is entered in the Minutes Without Activity to Close Terminal.
This feature, also called an "inactivity logoff," increases security by locking CIM GOLD when not active.
5.In the Minimum Length of Password field (mnemonic IOBSPWDL), enter the minimum password length for your institution’s default, with a minimum of 5 and a maximum of 40. If a number outside this range is entered, the following error message will appear: "PASSWORD value must be from 5 to 8." If employees attempt to set passwords with fewer characters than the minimum specified in this field, they will receive the following error: "PASSWORD IS NOT LONG ENOUGH OR INVALID SPACES IN PASSWORD." See Passwords for more information.
6.If you leave the Customer Service Security checkbox (mnemonic IOBSCSCHK) empty, GOLDPoint Systems support personnel can have access to your institution files. Mark this checkbox if you want to restrict GPS employees from accessing your institution's accounts and records.
7.If you mark the Force Alpha-Numeric Passwords checkbox field (mnemonic IOBSANPWD), all employees must use both letters and numbers in their passwords. If this field is left blank, employees can enter any variation of letters and/or numbers they want without restrictions. See Passwords for information.
8.If the Force Special Characters in Passwords checkbox field (mnemonic IOBSSCPWD) is marked, all employees will be required to have at least one special character in their passwords. If the field is left blank, special characters will not be required in passwords. See Passwords for information.
9.If necessary, enter information in the User-Defined Fields on the bottom of this screen. User Defined Fields are designated fields tied to each employee’s security setup that can be used for any purpose within an institution. For example, an institution could set up a field to show the title of the employee, date of hire, birth date, etc. See Information About User-Defined Fields for more information.
|
Record Identification: The fields on this screen are stored in the BSIO record (Security Institution Options). You can run reports for this record through GOLDMiner or GOLDWriter. See BSIO |
|---|
In order to use this screen, your institution must:
•Subscribe to it on the Security > Subscribe To Mini-Applications screen.
•Set up employees and/or profiles with either Inquire (read-only) or Maintain (edit) security for it on the CIM GOLD tab of the Security > Setup screen. |