Navigation: Miscellaneous Screens > GOLDPrint Screen Group >
Use this screen to indicate settings, create profiles, view scheduled/available reports, refine reports, and set up automatic reports and email addresses for GOLDPrint at your institution.

Miscellaneous > GOLDPrint > GOLDPrint Setup Screen
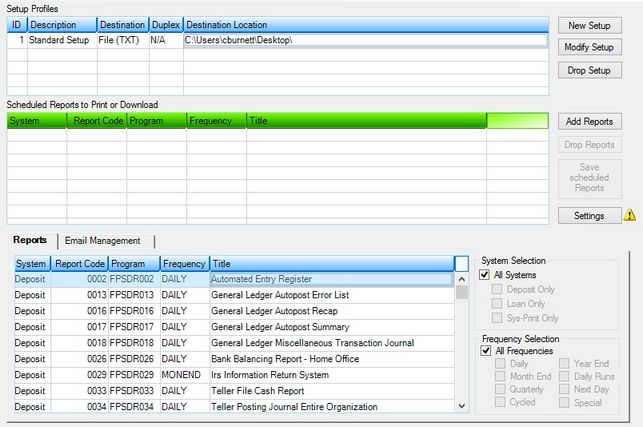
There are two main list views at the top of this screen that are visible regardless of which tab is selected. See below for more information about these list views.
This list view displays all current profiles set up on this screen. The columns in this list view are as follows:
•ID: This displays the unique identification number assigned to each profile. •Description: This displays the description of the profile. •Destination: This displays where the reports associated with the profile are sent (e.g., to a file or printer). •Duplex: This displays whether the reports will be printed in duplex mode (on both sides) or not. Note: This column only displays information if the Destination is a printer. •Destination Location: This displays where the reports will be sent. If the destination is a printer, this column displays the printer location or name. If the destination is a file, this column displays the path or location on the PC or network where the files will be downloaded.
The following Buttons can be used to modify this list view:
•<New Setup> - Click this button to bring up the New Setup dialog to determine where reports will be sent. •<Modify Setup> - Click this button to bring up the Modify Setup dialog to modify the profile selected in the Setup Profiles list view. •<Drop Setup> - Click this button to delete the profile selected in the Setup Profiles list view and all its associated reports. |
![]() Scheduled Reports to Print or Download list view
Scheduled Reports to Print or Download list view
This list view displays all reports associated with the profile selected in the Setup Profiles list view above. This list view is populated from the Reports list view. The columns in this list view are as follows:
•System: This displays the system that the report is associated with (Deposit, Loan, or Sys-Print). •Report Code: For deposit or loan reports, this displays the report code associated with the report. For sys-print reports, this displays the two-digit number associated with the Sys-Print setup. •Program: This displays the program associated with the report. •Frequency: This displays the frequency of the report. •Title: This displays the title or description of the report.
The following Buttons can be used to modify this list view:
•<Add Reports> - Highlight or select reports in the Reports list view and click this button to add the selected reports to this list view. •<Drop Reports> - Highlight or select reports in this list view and click this button to delete the selected reports. •<Save Scheduled Reports> - Click this button to save any modifications made to the scheduled reports. |
Some critical initialization information must be indicated before profiles can be created on this screen. Click <Settings> to open the Settings dialog. Use this dialog to indicate the necessary parameter information. A setup profile must also be set up before printing, downloading, or emailing reports from this screen. To create a profile, click <New Setup> to open the New Setup dialog. Use this dialog to determine where reports will be sent (file location, printer, specified email addresses, etc).
See GOLDPrint Setup Buttons to learn more about the function of each button on this screen.
The tabs on this screen are as follows: