Setting up Payment Schedules |
  
|
Navigation: Loan Screens > Transactions Screen Group > CP2 Screen > Payment Schedule tab >
Setting up Payment Schedules |
|
The number of frequencies for payment can be altered for approved loan payment schedules. When the term for the modified payment is over, the system returns to the original principal and interest payment on the loan. Multiple payment schedules can be set up for each account.
For example, a customer promises to pay $100 for the next three payments, $200 for three payments after that, and then return to the regular payment of $400. Two payment schedules would be set up on this screen: One for $100 for three payments, and one for $200 for three payments, starting on the Due Date after the first three payments.
The process for setting up a new payment schedule is outlined below.
To set up a new payment schedule:
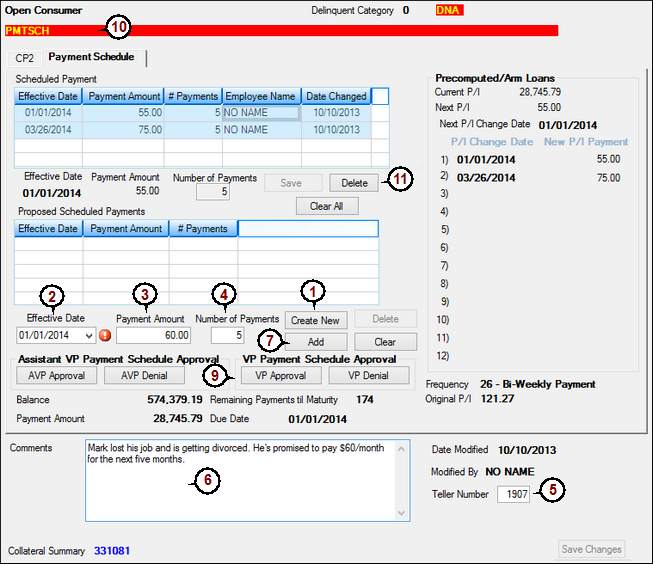
1. |
Click <Create New>. The Effective Date, Payment Amount, Number of Payments, and Teller Number fields will be enabled and display an error provider icon |
|||||
2. |
Enter the date when the new payment schedule will take effect in the Effective Date field. Depending on the loan frequency (monthly, weekly, bi-weekly, etc.), the effective date must land on a Due Date day. For example, if the loan is processed bi-weekly on every other Tuesday, the Effective Date must be a Tuesday on the bi-weekly week of the Due Date.
|
|||||
3. |
Enter the amount the customer is willing to pay in the Payment Amount field. This amount will be reflected in the Next P/I and Recurring Payment Amount fields (if the customer is set up with recurring payments). |
|||||
4. |
Enter the number of payments for the amount the customer is willing to pay for the designated frequency in the Number of Payments field. For example, if "3" is entered, the customer will be responsible for making the next three payments for the indicated Payment Amount. |
|||||
5. |
Enter a teller number in the Teller Number field. |
|||||
6. |
Enter any necessary comments to a manager about why the loan payment schedule is being modified in the Comments field. |
|||||
7. |
Click <Add>. The payment schedule will appear in the Proposed Schedules Payments list view. |
|||||
8. |
Notify a supervisor about the modified payment schedule requiring their approval. The GOLDTeller chat function can be used to quickly send a supervisor a notification.. |
|||||
9. |
When the supervisor is ready to approve the scheduled payment, they will need to access the Payment Schedule tab, enter a comment in the Comments field (if necessary), and click
|
|||||
10. |
Once the payment schedule has been approved, it will be displayed in the Scheduled Payment list view at the top of the screen, and the message "PMTSH" will display in the message line at the top of the screen to indicate to all users that this account has a payment schedule set up (see the screen example below). |
|||||
11. |
To delete a payment schedule, select it in the Scheduled Payment list view and click <Delete>. |