Holiday Scheduling Screen |
  

|
Navigation: Loans > Loan Screens > System Setup Screens >
Holiday Scheduling Screen |
|
The Holiday Scheduling screen allows you to schedule holidays on days that GOLDPoint Systems is open and would normally process your afterhours. Holidays for multiple years can also be scheduled. This schedule is currently used only for late charge assessments and creating past due/late charge notices in the Loan system (see the Afterhours Processing section below). As information is entered, changed, or deleted on this screen, it is stored in Deposits > History.
Holiday scheduling record retention periods can be set up for your institution on the Deposits > Definitions > System History Retention screen.
This screen is available only to employees at your institution who have security to use this screen. Any information that is changed on this screen by one employee will affect the CIM GOLD screens and fields for everyone at your institution. See the Security > Setup screen for more information about security.
Loans > System Setup Screens > Holiday Scheduling Screen
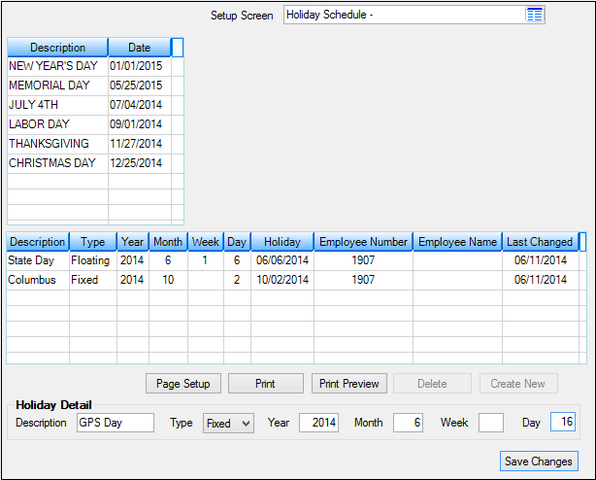
The list view at the top-left of this screen displays GOLDPoint Systems holidays, which are days for which afterhours will not be processed for any institution. These holidays are already scheduled in the system and cannot be entered again.
The main list view in the middle of this screen displays all holidays that have previously been entered by an employee at your institution. This list view also displays the employee name and number of the person who last changed any holiday information, as well as the date they made the changes (or created the holiday). The Holiday column displays the next occurrence of the scheduled holiday. Information in this column is calculated by the system using the data entered in the fields below.
|
Note: The Holiday column may list next year’s holiday date if you are looking at the Holiday Scheduling screen in the month of the holiday. |
|---|
To create a new scheduled holiday and add it to the main list view, follow the instructions below:
1.Click ![]() . The fields at the bottom of this screen will become file maintainable with red error providers
. The fields at the bottom of this screen will become file maintainable with red error providers ![]() next to the fields that must have information entered.
next to the fields that must have information entered.
2.In the Description field (mnemonic HDDSC2), type the name of the holiday you are setting up (e.g., Columbus Day). The description can only be 10 characters long.
3.From the Type field (mnemonic HDFIXD), select whether the holiday is a floating holiday (changes from year to year, such as Thanksgiving) or a fixed holiday (always on a specific date, e.g., the Fourth of July).
4.If you want the holiday to only be set for a given year, enter the year in the Year field (mnemonic HDYEAR). If you want the holiday to permanently stay on the system, leave the Year field blank.
5.Refer to step 3 above. If the holiday is a fixed holiday, the Month and Day fields (mnemonic HDMNTH/HDWKDY) must be entered. If the holiday is a floating holiday, the Month, Week, and Day fields must be entered.
•Valid Month values are 1 through 12 (January = 1, February = 2, etc.).
•When entering the Week value, indicate the week number of the month for the scheduled holiday (1st week = 1, 2nd week = 2, etc) or the number of times the weekday of the scheduled holiday has already occurred in the month (if the holiday is on the 2nd Tuesday but is in the third week, enter "2"). To schedule a holiday on the last day of the month, enter "5" in this field, even if there are only four weeks in the month.
•Day: For floating holidays, enter the number of the day for the week (Sunday = 1, Monday = 2, etc.). For fixed holidays, enter the day of the month (July 4 = 4, December 25 = 25).
6.Click ![]() . The holiday will now appear in the main list view, and the system will be affected accordingly.
. The holiday will now appear in the main list view, and the system will be affected accordingly.
To delete a holiday, double-click the holiday you want to delete from the main list view, and then click ![]() .
.
To print the Holiday Scheduling list, click ![]() or
or ![]() .
.
Holidays that are not GOLDPoint Systems scheduled holidays will affect whether or not late charge assessments or past due/late notices are created. If a holiday is a GOLDPoint Systems holiday, then the afterhours functions do not process. The night after a GOLDPoint Systems holiday, the system will automatically assess late charges or create notices which would have normally occurred on the holiday. However, when a holiday is an institution-specific holiday, such as a state holiday, the afterhours functions will process. This is to allow auto payments, check advances, inclearings, etc., to occur for your institution. Because your institution is actually closed on the holiday, the system has been programmed not to process the late charge assessment step. The next night, the assessments will occur and notices will also be generated. In order for the system to know to bypass the late charge assessment and notice creation process, the holiday must be set up on the Holiday Scheduling screen.
|
Record Identification: The fields on this screen are stored in the FPHD record (Holiday Schedule). You can run reports for this record through GOLDMiner or GOLDWriter. See FPHD in the Mnemonic Dictionary for a list of all available fields in this record. Also see field descriptions in this help manual for mnemonics to include in reports. |
|---|
In order to use this screen, your institution must:
•Subscribe to System Setup Screens on the Security > Subscribe To Mini-Applications screen.
•Set up employees and/or profiles with either Inquire (read-only) or Maintain (edit) security for System Setup Screens on the CIM GOLD tab of the Security > Setup screen.
•Set up the desired field level security in the FPHD records on the Field Level Security screen/tab. |