Check Format Setup Screen |
  

|
Navigation: Deposits > Deposit Screens > Check Printing Screen Group >
Check Format Setup Screen |
|
The Deposit Check Printing feature enables you to print on-site checks for deposit interest, maturity interest, retirement distributions, and club account checks. The Check Format Setup screen is used to set up check formats, which tell the system the size of the check, what data is available, and where on a check to place the data, such as the check amount, check date, payee, etc. You can set up some of your checks to print onsite in this system, and others can be set up and printed by GOLDPoint Systems for your institution. This is an administrative screen and access to it should be limited.
For information about the Loan and Accounts Payable systems' Check Format screens, see help for the Loans > Check Printing > Check Format Setup screen.
Check information is placed into the Check Printing utility through various online or afterhours transactions. After the data has been sent to the Check Printing utility, your institution then prints the checks using the Deposits > Check Printing > Deposit Checks screen.
Check printing is controlled by the type of check being printed (formats). In some cases, your institution can further control when and where a check is printed. For example, you could print all deposit interest checks at one time, or each branch could print its own checks.
Deposit check information is automatically added to the Check Reconciliation system (found in GOLD Services > Check Reconciliation > Check Detail when Institution Option CKRC is set to "Y").
The check printing process allows you to do the following:
•Build your own institution parameters (formats) that control the specifics of the checks being printed, including the size of the check and where on a check data will be placed.
•Copy formats to quickly create new formats.
•View check data prior to printing.
•Print all checks in a specific format at one time or select specific checks in a format to be printed. This allows departments or branches to print their own checks.
•Reprint checks (due to paper jams, etc.).
•Delete checks.
•Create different formats for each type of disbursement.
•Print logos, signatures, and MICR lines, allowing you to use blank check paper instead of pre-printed checks.
•Control who has access to set up or change formats.
•Control the printing of checks through employee security, which can be set to allow employees to print checks only for specific formats.
See the following example of this screen displaying a check format that has already been set up:
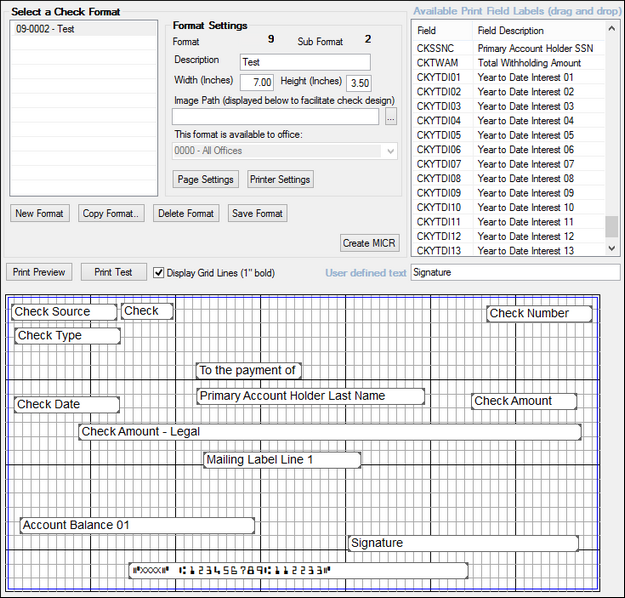
Deposits > Check Printing > Check Format Setup Screen
Setting Up Check Formats
Before your institution can begin to print checks using the Deposit Checks screen, you must set up check formats for each type of check using this screen (Check Format Setup). GOLDPoint Systems has assigned format 9 for all types of deposit account checks, such as interest, maturity interest, retirement distributions, or club accounts. Sub-formats can be used if different checks are created for the various types available. The institution then uses the formats to direct where and what data is printed on a check.
Buttons
This screen contains the following buttons:
<Page Settings> |
Clicking this button brings up the Page Setup dialog, which you can use to set up paper size, orientation, and margins. Note: By default you cannot set checks to print duplex. |
||
<Printer Settings> |
Clicking this button brings up the Print dialog, which you can use to print checks. |
||
<New Format> |
To create a new format, click this button and then assign a format number between 1 and 99 in the Format field. Click <Save Format> and the new format will appear in the Select a Check Format list view. |
||
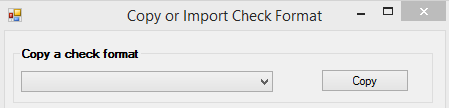
<Copy Format> |
This feature allows you to quickly copy a format that has already been created or to import a format from another file. Clicking this button brings up the Copy or Import Check Format dialog. See the following example.
In this dialog, select the number of the format you want to copy, then click <Copy>. This immediately copies the format and displays the data. Next enter the new format number into the Format field of the Check Format Setup screen. The words "(copy of)" and the name of the format you copied will automatically be displayed in the Description field. Clear and change the description for the new format, make any other modifications, such as what fields to display on the check, and click <Save Format>. |
||
<Delete Format> |
To delete a format, select the format from the Select a Check Format list view, then click this button. A dialog box will be enabled to verify the delete. Click "Yes" to complete it. |
||
<Save Format> |
After creating a new format, copying a format, or modifying a format, click this button to save it. |
||
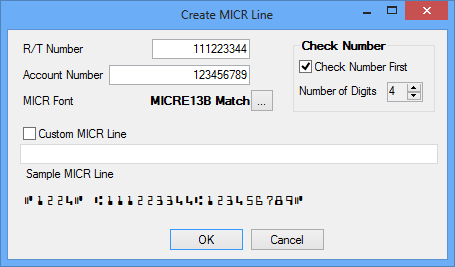
If you print on blank check paper, you must print the Magnetic Ink Character Recognition (MICR) data on your checks. Selecting a format and clicking this button brings up the Create MICR Line dialog. See the following example.
This dialog is used to enter the routing/transit number, the bank's account number, and the MICR font. You can also control whether the check number displays at the beginning of the MICR line and the number of digits that appear in the account number. You can customize the MICR line if necessary; however, this feature would be rarely used. For more information on MICR, see the MICR Information help topic.
|
|||
<Print Preview> |
Click this button to view how data will actually appear on a check. This is helpful, for example, to see if the size of data would overlap other data, to see where asterisks display, and how the account number would be displayed. |
||
<Print Test> |
This feature enables you to print a test check. The purpose for printing a test check is to be sure the printer is set up correctly and that the check format is printing everything in the correct places. |
|
Record Identification: The fields on this screen are stored in the CSFM record (Check Format Master). You can run reports for this record through GOLDMiner or GOLDWriter. See CSFM in the Mnemonic Dictionary for a list of all available fields in this record. Also see field descriptions in this help manual for mnemonics to include in reports. |
|---|
In order to use this screen, your institution must:
•Subscribe to it on the Security > Subscribe To Mini-Applications screen.
•Set up employees and/or profiles with either Inquire (read-only) or Maintain (edit) security for it on the CIM GOLD tab of the Security > Setup screen. |