MICR Information |
  

|
Navigation: Deposit Screens > Check Printing Screen Group > Check Format Setup Screen >
MICR Information |
|
Using the <Create MICR> Button
When creating a new check format, you must create the MICR (Magnetic Ink Character Recognition) line information for the check. You can use different accounts for each check format you create. When <Create MICR> is clicked on the Check Format Setup screen, a dialog box appears that allows you to enter the routing transit, account number, check number, and font for the MICR line. The order of the fields is the same for all check formats, with the exception of the Check Number field. It can be printed at the beginning of the MICR line by checking the Check Number First box. As you enter the data in the fields, the Sample MICR Line data is shown below.
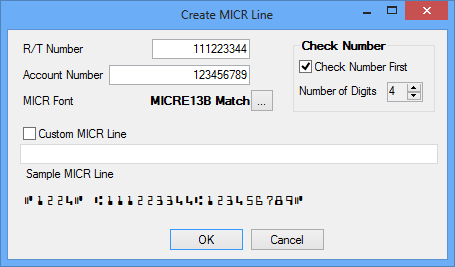
The fields on this dialog are explained below.
R/T Number |
Enter the routing transit number of your bank in this field. It will be the first data to print on the checks, unless the Check Number First field is checked. |
Account Number |
Enter the checking account number to be printed on the checks that use this format. |
Check Number First |
Check this box if you want the check number to be printed before the R/T number for the checks that use this check format. |
Number of Digits |
Enter the number of digits that will be printed for the check number on checks created using this check format. |
MICR Font |
Browse to the file on the PC where you have stored the MICR font you want to use to print checks using this format. You must have saved the format on your PC before you can add it to this format. The computer that is used to print the checks must also have the font on it in order to print the check correctly. |
Custom MICR Line |
Check this box if you need to create a custom MICR line (for example, if you do not want to follow the order that is defaulted in the standard MICR line print, or if you want to use a special character). We have created two special character codes for the checks printed. Use A for the separator before the check number. Use a C for the separator after the account number and before the check number. If the check number is printed first, use the C before and after the check number.
Click <OK> to save changes or <Cancel> to close the screen without changes. |
What Is MICR?
Magnetic Ink Character Recognition (MICR) is the common machine language specification for the paper-based payment transfer system. It consists of magnetic ink-printed characters of a special design that can be recognized by high-speed magnetic recognition equipment. This series of readable characters provides the receiving party with information needed for processing the check, including the check number, bank routing number, checking account number, and, in some cases, the amount of the check.
In addition to their unique fonts, MICR characters are printed with a magnetic ink or toner. Magnetic printing is used so the characters can be read reliably, even when they have been overprinted with other marks, such as cancellation stamps.
MICR characters are printed in the form of an E-13B or CMC-7 font. Each font series is made up of a series of numbers and symbols specifically designed for readability on check sorting machines that read at extremely high rates of speed. The symbols provide a beginning and ending point for each group of numbers, allowing the machine to quickly determine what each series of numbers signifies. Line placements, character placement, skew and quality are critical components of printing MICR. The line must be positioned precisely on the check to be in the MICR clear band area.
|
WARNING: Printing a MICR line requires that the printer used to print checks uses MICR ink or toner. You must also have special MICR fonts. Printers generally print all check information, not just the MICR line, using the same ink. If you are printing logos and signatures, they will probably also be printed with this ink. Your institution's internal systems department controls the printers, ink, file path, and fonts; they are not controlled by GOLDPoint Systems. |
|---|