Navigation: GOLD Services > GOLD Services Screens >
The Merchant ID screen under GOLD Services is used to set up merchant IDs that identify your institution and branches to your credit card processor for authorized transactions. Adding Gateway payment processors and merchant ID's requires some setup by GOLDPoint Systems, as well as setting up this screen. Once merchant IDs are added on this screen, you need to connect offices with the merchant ID they use by using the Gateway/Merchant ID field on the Office Information screen > Other tab (under GOLD Services).
Note that this screen is only accessible to editor users as of April 2021.
To create a new payment gateway or merchant ID, your GOLDPoint Systems account manager will need to initially fill out the information on the Merchant ID screen. But once the merchant has been added, you can make minor changes, such as moving offices or investors under the responsibility of specific merchants.
Your customers can then use credit cards to make loan payments. The loan payments are then routed through the merchant service accordingly. Your GOLDPoint Systems account manager can help you set up additional options in order for customers to use credit cards for loan and fee payments either through the Loans > Transactions > EZPay screen or through your website.

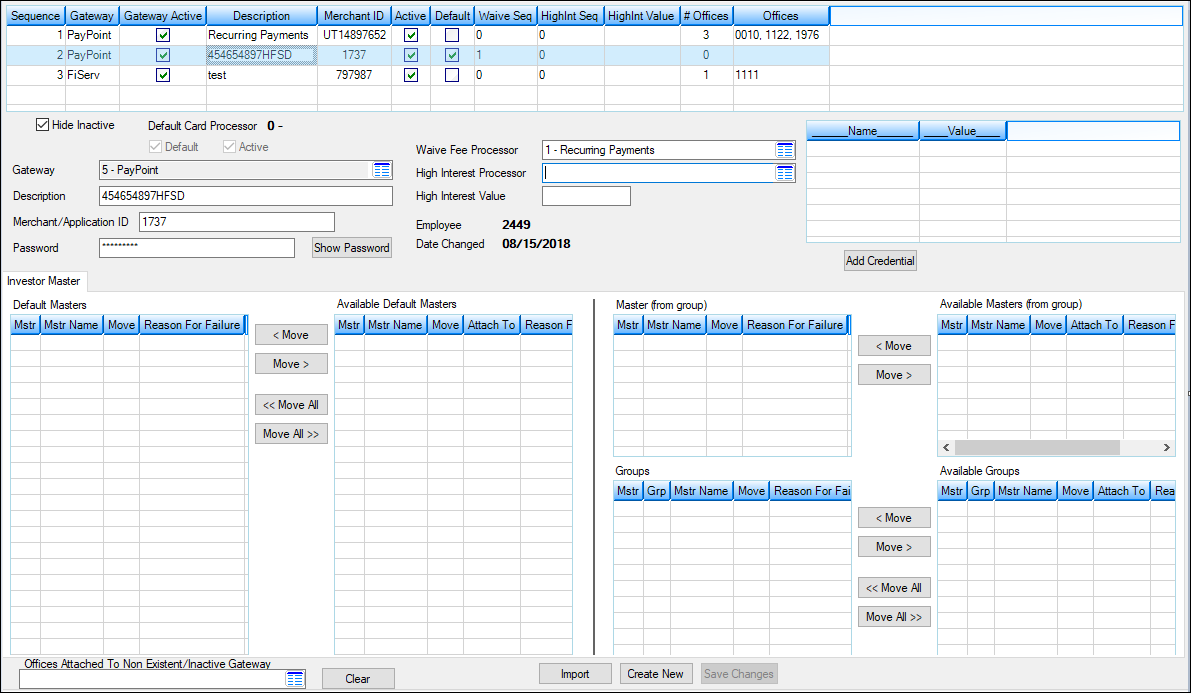
GOLD Services > Merchant ID Screen
See Merchant ID fields for more information about the fields on this screen. See the table below for information about the buttons on this screen.
Button |
Description |
|---|---|
|
Click this button to display the actual password for the merchant services. In the Password field, the password is displayed with asterisks (****). But when you click this button, the password is displayed in a pop-up for about three seconds, as shown below:
After three seconds, the pop-up box and password goes away. You must have proper security clearance in order to view the password.
Security for this field is found on the Loans > System Setup Screens > Field Level Security screen. The option is found in the FPFS (Miscellaneous Function Security) record for field FSDSPW--Don't Show Password. If this option is checked, the |
|
Click this button to clear the Offices Attached to Non Existent/Inactive Gateway field and remove any Offices at your institution that are attached to an invalid Gateway. |
|
Use these buttons to add or remove offices to or from the Offices for Merchant list view or Investor Master list view. See Connecting Merchants to Offices/Investors for more information. |
|
Use these buttons to add or remove all of offices or investors using this merchant. See Connecting Merchants to Offices/Investors for more information. |
|
Click this button to import Merchant ID information into the Merchant ID screen from your files. Only tab-delimited files will be recognized. You can save a spreadsheet from a program such as Microsoft Excel® to a tab-delimited file. When saving the file, make sure to not include any header descriptive rows (right-click on the header row and select "Delete").
The text file should include the following columns:
Gateway ID (1, 2, 3, etc. Same as the Gateway field.) Name (The name used to describe the merchant ID's. Same as the Description field.) Merchant ID (This is the merchant ID's number with your institution. Same as the Merchant ID field.) Password (Password for the merchant ID. Same as the Password field.) Offices (These are the offices that use this merchant ID. Same as the Offices for Merchant list view.)
The system will automatically check for errors once you upload a file and display those errors on the Import dialog box, as shown below.
If errors are reported, you will need to access your text file and make any changes, then save it and import the file again. Once all errors are fixed, click <Upload> on the Import dialog box, and the records will be uploaded into CIM GOLD and displayed on the Merchant ID screen. |
|
Click this button to create a new Merchant ID record for your institution or branches. |
|
Click this button to save any change made to the Merchant ID screen. |
|
GOLDPoint Systems Only: Options to allow credit card payments are set up on the GOLDPoint Systems > EZPay IMAC Table screen.
Additionally, programmers will set up all merchant information using the GOLDPoint Systems > Payment Portal Settings. These settings establish payment processor specifics in both EZPay in CIM GOLD and GOLD Account Center (GAC). |
|---|
In order to use this screen, your institution must:
•Subscribe to it on the Security > Subscribe To Mini-Applications screen.
•Set up employees and/or profiles with either Inquire (read-only) or Maintain (edit) security for it on the CIM GOLD tab of the Security > Setup screen. |