Navigation: GOLD Services > GOLD Services Screens > Merchant ID Screen >
Merchant ID fields
It's not uncommon for your institution to only use one merchant for processing credit card payments. However, some institutions use many merchants and want to run payments through specific merchants depending on the office or investor associated with the account.
To make changes to any listed merchants, select the merchant from the top-left list-view table, and then make the changes to the remaining fields on this screen, as described below. If you are setting up a merchant for the first time, you will need assistance from GOLDPoint Systems to know the merchant ID, password, and other applicable information.
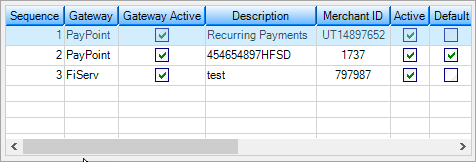
The list view table at the top-left of the Merchant ID screen contains all merchant IDs that have been designated for use by your institution. Information displayed in this list includes data entered in the fields on this screen, a system-defined Sequence number, whether the merchant is active or the default, and the number of offices/investors that use this merchant.
Select a merchant in this table to view or change the details of this merchant.
See example below:
 |
Merchants do not need to be connected to offices or investors. However, if your institution wants certain offices or investors to work with some merchants and others to work with other merchants, then this option is available to you. For example, maybe some merchants only operate in certain states. Therefore, only accounts from offices in those states would use that merchant. Or maybe the investor prefers a specific merchant; all loans for that investor would only work with that merchant.
Note: You must have CIM GOLD version 7.20.4 or higher to assign merchants by investor.
To assign a merchant to office(s):
1.On the Merchant ID screen, select the merchant for which you will be assigning offices in the top-left list view table. 2.Make sure the Office radio button is selected. 3.In the Offices not attached to Merchant list-view table, select one or all of the offices you want to use for this merchant. Offices are pulled from the GOLD Services > Office Information screen. You can sort the table by clicking on the column headings (up or down).
4.Click 5.Click
See steps below:
To assign a merchant to investor(s):
Investors are attached to loans using a group and master number. Investors are assigned to accounts using the Loans > Investor Reporting > Loan Investor Fields screen. Details of investor master and group numbers are created using the following screens under Investor Reporting: Investor Group and Investor Master. Once those have all been established, complete the following steps to assign a merchant to an investor:
1.On the Merchant ID screen, select the merchant for which you will be assigning an investor in the top-left list view table. 2.Make sure the Investor Master radio button is selected.
3.In the Available Default Masters list, select one or all of the investor masters you want to use for this merchant. You can sort the table by clicking on the column headings (up or down).
4.Click 5.Click
See steps below:
If you want only certain accounts connected to an investor group to be associated with this merchant, complete the following steps:
1.Select the vendor master in the Available Masters (from group) to assign to this merchant. 2.Click 3.Select the groups to associate with the merchant in the Available Groups list. 4.Click 5.Click
See steps below:
|
Field Descriptions
The other fields on this screen are as follows (click on a field in the image to jump to a description):
Field |
Description |
||
|---|---|---|---|
Use this field to indicate which credit card processor will be used in relation to the merchant ID being created. Card processors must first be set up by GOLDPoint Systems before they are listed in this field. Once a processor is selected and
GOLDPoint Systems Only: The Default Card Processor field on the GOLDPoint Systems > EZPay IMAC Table screen shows all available card processors for the institution. If more card processors need to be added to this list, a programmer will need to add them. |
|||
Use this field to enter any information needed (such as a name or division) to identify the merchant ID being created/edited in your institution's records. |
|||
Use the Merchant/Application ID field to indicate the identification number of the merchant ID being created/edited.
Use the Default checkbox field to indicate whether the merchant ID is a default ID. If this field is marked, all payments from an account that is tied to a branch or investor that isn't assigned a merchant ID, then the payment will be routed to this default merchant. Once you mark a merchant ID record as being the default record, you cannot make changes to this box. Instead, you will need to mark a different merchant ID as the default, and then the box for this merchant ID record is cleared. In other words, only one merchant ID record can be selected as the default record at a time. |
|||
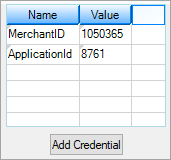
To the right is a list-view table showing any additional merchant ID numbers (MID). Some institutions have more than one merchant ID for a merchant. Your GOLDPoint Systems account manager will set this up for your institution. See below:
 |
|||
Use this field to indicate the password for access to the merchant ID's account with your institution. Click
After three seconds, the pop-up box and password goes away. You must have proper security clearance in order to view the password. Security for this field is set up on the Loans > System Setup Screens > Field Level Security screen. The option is found in the FPFS (Miscellaneous Function Security) record for field FSDSPW--Don't Show Password. If this option is checked, the |
|||
High Interest Processor |
Use this field to select one of the merchants set up for the institution (pulled from the main list at the top of the screen). The merchant selected in this field will be used to process all card payments for accounts with an APR greater than or equal to the High Interest Value indicated below.
Certain third party card processors won't accept card payments for accounts above a specified APR threshold. If the institution uses such a processor, use these fields to designate an alternate processor to use with high APR card payments. If these fields aren't used, the card payment option in EZPay will be disabled for such payments and only ACH payments will be allowed. |
||
High Interest Value |
Use this field to indicate an APR value to designate as high interest. This value is used by the High Interest Processor field above. |
||
Use this field to indicate the fee processor used for the selected merchant ID. Contact GOLDPoint Systems for more information about setting up merchant fee processors. |
|||
Check this box to indicate that the merchant ID being created/edited is currently available for use by your institution. If this is the Default Card Processor (see below), this box is automatically checked and you cannot make changes. If you want to mark a card processor as inactive, you must first set a different merchant ID to be the default, then this merchant ID is no longer the default and you can then uncheck this box.
Before deselecting the Active box for a merchant ID record to indicate it is inactive, you should first move any offices attached to that merchant from the Offices for Merchant list view to the Offices Not Attached to Merchant list view (as explained at the top of this help page). You can then assign those offices with a different, active merchant ID record.
You can not delete merchant ID records once they've been added to the system. You can only mark them as inactive. Then you can hide inactive merchant ID records by checking the Hide Inactive box below.
See also help for the Offices Attached To Non Existent/Inactive Gateway field below. |
|||
This field displays the default credit card processor used by your institution for credit card payments. The system only allows you to have one card processor be the default card processor. The default card processor is indicated by checking the Default box (above).
If you want to change which processor your institution uses for the default processor, find and select the processor in the list view to the left, then check the Default box. Once the Default box has been checked for a card processor, the box becomes checked and grayed out for the new default processor, but for the previous default processor, the check in the Default box is removed. |
|||
This field displays the number of the employee who last edited information about this merchant ID record on this screen. |
|||
This field displays the most recent date information about merchant IDs was edited on this screen. |
|||
Use this field to indicate whether inactive merchant IDs (ID items with the Active field above left blank) should appear in the list view at the top of this screen. Merchant ID records cannot be deleted once they've been added to the system. You can only mark them as inactive (see Active above). Then you can hide inactive merchant ID records by checking the Hide Inactive box. |
|||
This field displays any offices at your institution that are attached to an invalid Gateway (Merchant ID). Click |