Navigation: CIM GOLD What's New > What's New in Version 7.20.3 >
Enhancement |
Description |
|---|---|
Collection System Now Defaults to Local Branch
CMP: 1208 Work Order: 43946
CIM GOLD version 7.20.3 |
When collectors at your institution access Queues > Collection Queues screens (Accounts, Assignments), those screens now default to their local branch and load that branch's queues.
This change was implemented for more convenience and increased efficiency for collectors. |
Can Now Change Detail Screen Without Rebuild
CMP: 4730 Work Order: 48610
CIM GOLD version 7.20.3 |
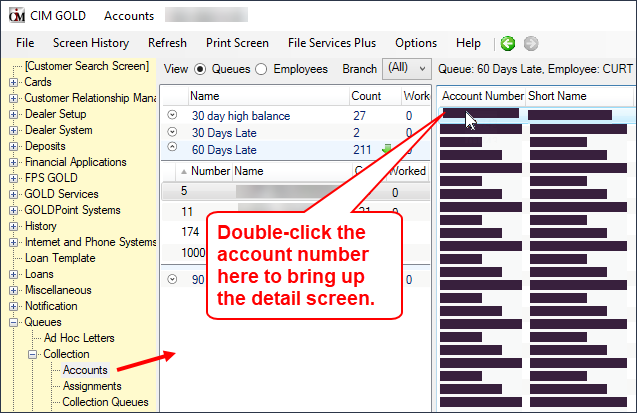
We have enhanced the Collection Queues system so users can now double-click an account on the Queues > Collection > Accounts screen, and the system will bring up the detail screen for that account. The Accounts screen can also be found as a tab on the Queues > Collection > Queue Administration screen. See Figure 1 below.
The request for this feature came from the Advisory Board.
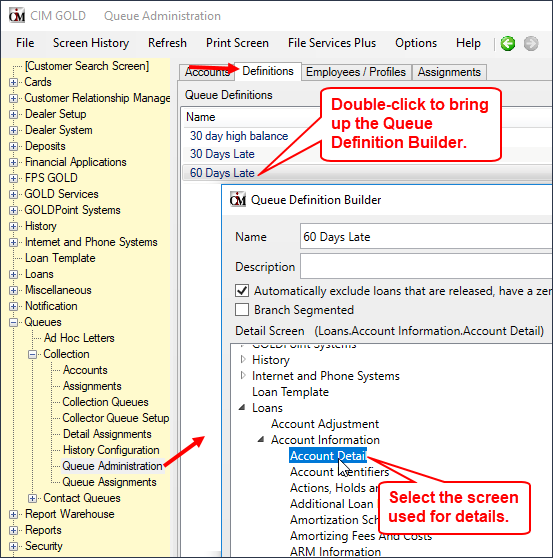
The detail screen, which is the screen that appears when users click the Detail tab during collection queue processing on the Collection Queues screen, is designated by supervisors when setting up collection queues. Supervisors select the detail screen for queues using the Definitions tab of the Queue Administration screen. See Figure 2 below.
|

Figure 1: Queues > Collection > Accounts Screen

Figure 2: Queues > Collection > Queue Administration Screen
Enhancement |
Description |
|---|---|
|
CMP: 9070
CIM GOLD version 7.20.3 |
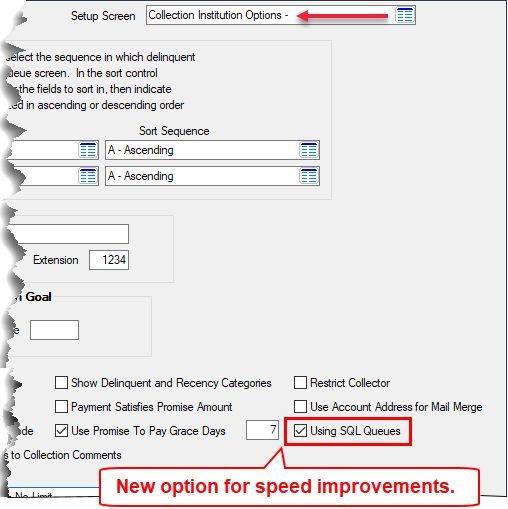
We have added an option, Using SQL Queues (QOSQLQ), to the Loans > System Setup Screens > Collection Institution Options screen. This option is for GOLDPoint Systems' use. It allows us to establish institutions are using the SQL-based Collection Queues system, instead of the legacy host-based Collection system. Most of our clients are already using the SQL-based Collection Queues system, which is set up on the Queues > Collection > Queue Administration screen.
We added this option to the Collection Institution Options screen to improve performance in the afterhours. If this option is selected, the host will not try to build collection queues when none are needed. See the example of this option below: |

Loans > System Setup Screens > Collection Institution Options Screen
Enhancement |
Description |
|---|---|
Additional Borrower Address Information Added to Contact Queues
CMP: 8106 Work Order: 52158
CIM GOLD version 7.20.3 |
We have added additional merge fields to Contact Queues that pull Physical Address information for up to four names in the household.
The new fields are described below.
For a list of all available fields in Contact Queues, see the Merge Fields in Contact Queues topic. See also: Create a Mail Merge Letter from Contact Queues. |
Merge Field |
Merge Info |
|---|---|
CIF Address Line 3 |
This is the city, state, and Zip code for the Mailing Address connected to the account. This is pulled from the Mailing Address field (NTADDR) on the Accounts tab of the Customer Relationship Management > Households screen > Accounts tab. |
CIF Address Line 3 2 |
This is the city, state, and Zip code for the Property Address connected to the account. This is pulled from the Property Address field (NTPADD) on the Accounts tab of the Customer Relationship Management > Households screen > Accounts tab. |
CIF Person PhysicalAdr Line 1 |
This field pulls Street 1 of the Physical Address for the first person listed in the Names list-view table on the Customer Relationship Management > Households screen > Names tab.
|
CIF Person PhysicalAdr Line 2 |
This field pulls Street 2 of the Physical Address for the first person listed in the Names list-view table on the Customer Relationship Management > Households screen > Names tab. |
CIF Person PhysicalAdr Line 3 |
This field pulls the city, state, and Zip code of the Physical Address for the first person listed in the Names list-view table on the Customer Relationship Management > Households screen > Names tab. |
CIF Person PhysicalAdr County |
This field pulls the county of the Physical Address for the first person listed in the Names list-view table on the Customer Relationship Management > Households screen > Names tab. |
CIF Person 1 PhysicalAdr Line 1 |
This may be a bit confusing, but this field pulls Street 1 of the Physical Address for the second person listed in the Names list-view table on the Customer Relationship Management > Households screen > Names tab.
|
CIF Person 1 PhysicalAdr Line 2 |
This field pulls Street 2 of the Physical Address for the second person listed in the Names list-view table on the Customer Relationship Management > Households screen > Names tab. |
CIF Person 1 PhysicalAdr Line 3 |
This field pulls the city, state, and Zip code of the Physical Address for the second person listed in the Names list-view table on the Customer Relationship Management > Households screen > Names tab. |
CIF Person 1 PhysicalAdr County |
This field pulls the county of the Physical Address for the second person listed in the Names list-view table on the Customer Relationship Management > Households screen > Names tab. |
CIF Person 2 PhysicalAdr Line 1 |
This may be a bit confusing, but this field pulls Street 1 of the Physical Address for the third person listed in the Names list-view table on the Customer Relationship Management > Households screen > Names tab.
|
CIF Person 2 PhysicalAdr Line 2 |
This field pulls Street 2 of the Physical Address for the third person listed in the Names list-view table on the Customer Relationship Management > Households screen > Names tab. |
CIF Person 2 PhysicalAdr Line 3 |
This field pulls the city, state, and Zip code of the Physical Address for the third person listed in the Names list-view table on the Customer Relationship Management > Households screen > Names tab. |
CIF Person 2 PhysicalAdr County |
This field pulls the county of the Physical Address for the third person listed in the Names list-view table on the Customer Relationship Management > Households screen > Names tab. |
CIF Person 3 PhysicalAdr Line 1 |
This may be a bit confusing, but this field pulls Street 1 of the Physical Address for the fourth person listed in the Names list-view table on the Customer Relationship Management > Households screen > Names tab.
|
CIF Person 3 PhysicalAdr Line 2 |
This field pulls Street 2 of the Physical Address for the fourth person listed in the Names list-view table on the Customer Relationship Management > Households screen > Names tab. |
CIF Person 3 PhysicalAdr Line 3 |
This field pulls the city, state, and Zip code of the Physical Address for the fourth person listed in the Names list-view table on the Customer Relationship Management > Households screen > Names tab. |
CIF Person 3 PhysicalAdr County |
This field pulls the county of the Physical Address for the fourth person listed in the Names list-view table on the Customer Relationship Management > Households screen > Names tab. |
CIF IRS Owner PhysicalAdr Line 1 |
This field pulls Street 1 of the Physical Address for the IRS Owner on the account. The person designated as the IRS Owner is done on the Customer Relationship Management > Households screen > Accounts tab by selecting the name from the IRS Owner field. |
CIF IRS Owner PhysicalAdr Line 2 |
This field pulls Street 2 of the Physical Address for the IRS Owner on the account. The person designated as the IRS Owner is done on the Customer Relationship Management > Households screen > Accounts tab by selecting the name from the IRS Owner field. |
CIF IRS Owner PhysicalAdr Line 3 |
This field pulls the city, state, and Zip code of the Physical Address for the IRS Owner on the account. The person designated as the IRS Owner is done on the Customer Relationship Management > Households screen > Accounts tab by selecting the name from the IRS Owner field. |
CIF IRS Owner PhysicalAdr County |
This field pulls the county of the Physical Address for the IRS Owner on the account. The person designated as the IRS Owner is done on the Customer Relationship Management > Households screen > Accounts tab by selecting the name from the IRS Owner field. |